The lot view

Lesson 04

Learn tsmap

Learn tsmap · 04 The lot view

In this lesson

One wafer can mislead you: a pattern may be chance. A lot can show what repeats. This lesson shows how to look across all the wafers at once, and how to label wafers so you can compare them.

  • Combine every wafer of a lot into one stacked map
  • Select the same dies on every wafer
  • Name wafer splits and show them on the maps
  • Name bins and choose which ones count as a pass
Learn tsmap · 04 The lot view

Gallery and stack

Learn tsmap · 04 The lot view

One card per wafer

A gallery shows each wafer on its own card. This is EDGE-LOT-01, eight wafers with an edge-ring defect. The buttons above act on all the cards at once (lesson 02).

EDGE-LOT-01 as a gallery, one card per wafer

Learn tsmap · 04 The lot view

Stack the lot

One wafer's pattern can be chance. The same die positions failing on many wafers is not. Under Lot aggregation, three plot modes lay the wafers over one another, so what repeats stands out.

The Plot mode menu with its three stacked modes outlined

Learn tsmap · 04 The lot view

Stacked Hard Bins

Stacked Hard Bins draws one card per bin. Each die position is coloured by how many wafers had that bin there: 0 to 8 here. Pass is high everywhere except a ring at the edge, where the defect sits. A defect that repeats on every wafer is far easier to see here than on any single map.

Stacked Hard Bins for EDGE-LOT-01, with the stack header outlined

Learn tsmap · 04 The lot view

Stacked Soft Bins

Stacked Soft Bins does the same for soft bins, so each lot-level failure mode shows as its own map.

Stacked Soft Bins for EDGE-LOT-01

Learn tsmap · 04 The lot view

Stacked Test Values

Stacked Test Values draws one card per measured test (three here), with the values combined across the wafers. The header says how many wafers were stacked and how they were combined, so you always know what you are looking at.

Stacked Test Values: one card per test, with the Σ button outlined

Learn tsmap · 04 The lot view

Aggregation method

The Σ button picks how the wafers combine at each position. Choose the one that answers your question. With Std Dev, a bright position is where wafers disagree; with Mean, where they agree on a high value.

The Aggregation method menu: Mean, Median, Std Dev, Min, Max and Count

Learn tsmap · 04 The lot view

Wafers that are not stacked

Wafers with other pass bins or ring counts are not stacked, because their results would not be comparable.

Learn tsmap · 04 The lot view

Selecting across wafers

Learn tsmap · 04 The lot view

Select dies on one wafer

Selecting dies is how you ask "what is going on here?" about part of a wafer. Drag a box on a map: the dies inside it are selected and the rest fade. Ctrl or Cmd + click adds or removes a die; a click outside the wafer clears it. Lesson 08 charts a selection.

A box dragged on W01: its dies stay bright, the rest fade

Learn tsmap · 04 The lot view

Select the same dies on every wafer

By default each card selects on its own. Turn this on when you want to check whether a region behaves the same way on every wafer.

The Select the same dies on every wafer button, outlined

Learn tsmap · 04 The lot view

One box, every wafer

Drag a box on one wafer and the same positions are selected on every wafer. The badge counts them, and the button clears them.

A box dragged on W01 selects the same dies on every wafer; the badge reads 24

(Charts of the selected dies are covered in lesson 08.)

Learn tsmap · 04 The lot view

Pick whole wafers

To look at some wafers rather than some dies, Ctrl or Cmd + click a card's header to pick that wafer. The toolbar counts the picked wafers. Right-click a picked card and the charts and tables cover every die of every picked wafer.

Two wafer cards picked, with the toolbar counting them

Learn tsmap · 04 The lot view

Wafer splits

Learn tsmap · 04 The lot view

What a split is

A split is a name you give a wafer when the test data file doesn't include one, such as a process corner. It is how you tell tsmap which wafers belong together. Splits are what Group by compares in Insights (lesson 05). Setup ▾ → Splits… opens the dialog.

The Setup menu with Splits… outlined

Learn tsmap · 04 The lot view

The Splits dialog

The banner at the top says where things stand. The sample lot's corners are already assigned, so you can see what a finished assignment looks like.

The Wafer splits dialog for the sample lot

Learn tsmap · 04 The lot view

Splits in the labels

With Show split in wafer map labels ticked, the split follows the wafer ID on every card.

Card headers reading W01 · TT, W02 · FF and W03 · TT

Learn tsmap · 04 The lot view

Plain wafer IDs

Untick Show split in wafer map labels and the cards show plain wafer IDs. The assignments are unchanged either way. The option only changes what the labels say.

Card headers reading W01, W02 and W03

Learn tsmap · 04 The lot view

Assign a split

Tick wafers and type a name 1, then Assign to selected 2. Clear split 3 clears the ticked wafers; Clear all clears every wafer.

The dialog after Clear all, with ten wafers ticked and TT typed

Learn tsmap · 04 The lot view

Reuse a name

Every action applies at once. Names in use appear beside In use: click one to reuse it, so TT and tt don't drift apart into two groups.

The dialog after assigning TT to ten wafers

Learn tsmap · 04 The lot view

Save, load, finish

Save splits… 1 writes every wafer's split to a CSV. Load splits… 2 reads one back, matching by lot and wafer ID. Done 3 closes the dialog.

The Save splits, Load splits and Done buttons, outlined

Learn tsmap · 04 The lot view

Remembered for the lot

You do not have to assign splits again. Reopen the same lot and its splits come back, with the dialog open to show them. Clear all forgets them. A file with no lot ID cannot be matched, so save its splits to a CSV.

Learn tsmap · 04 The lot view

Naming and judging bins

Learn tsmap · 04 The lot view

Bin definitions…

Bin numbers mean little until they have names, and which bins count as a pass decides the yield of every wafer. Setup ▾ → Bin definitions… opens a table of every hard and soft bin, with its die count, a name, whether a hard bin passes, and optionally the colour it is drawn in on the maps.

STDF and ATDF files carry names and pass flags of their own, so the table starts filled in. Edit a name or a colour in its cell. Nothing changes in the lot until you press Apply.
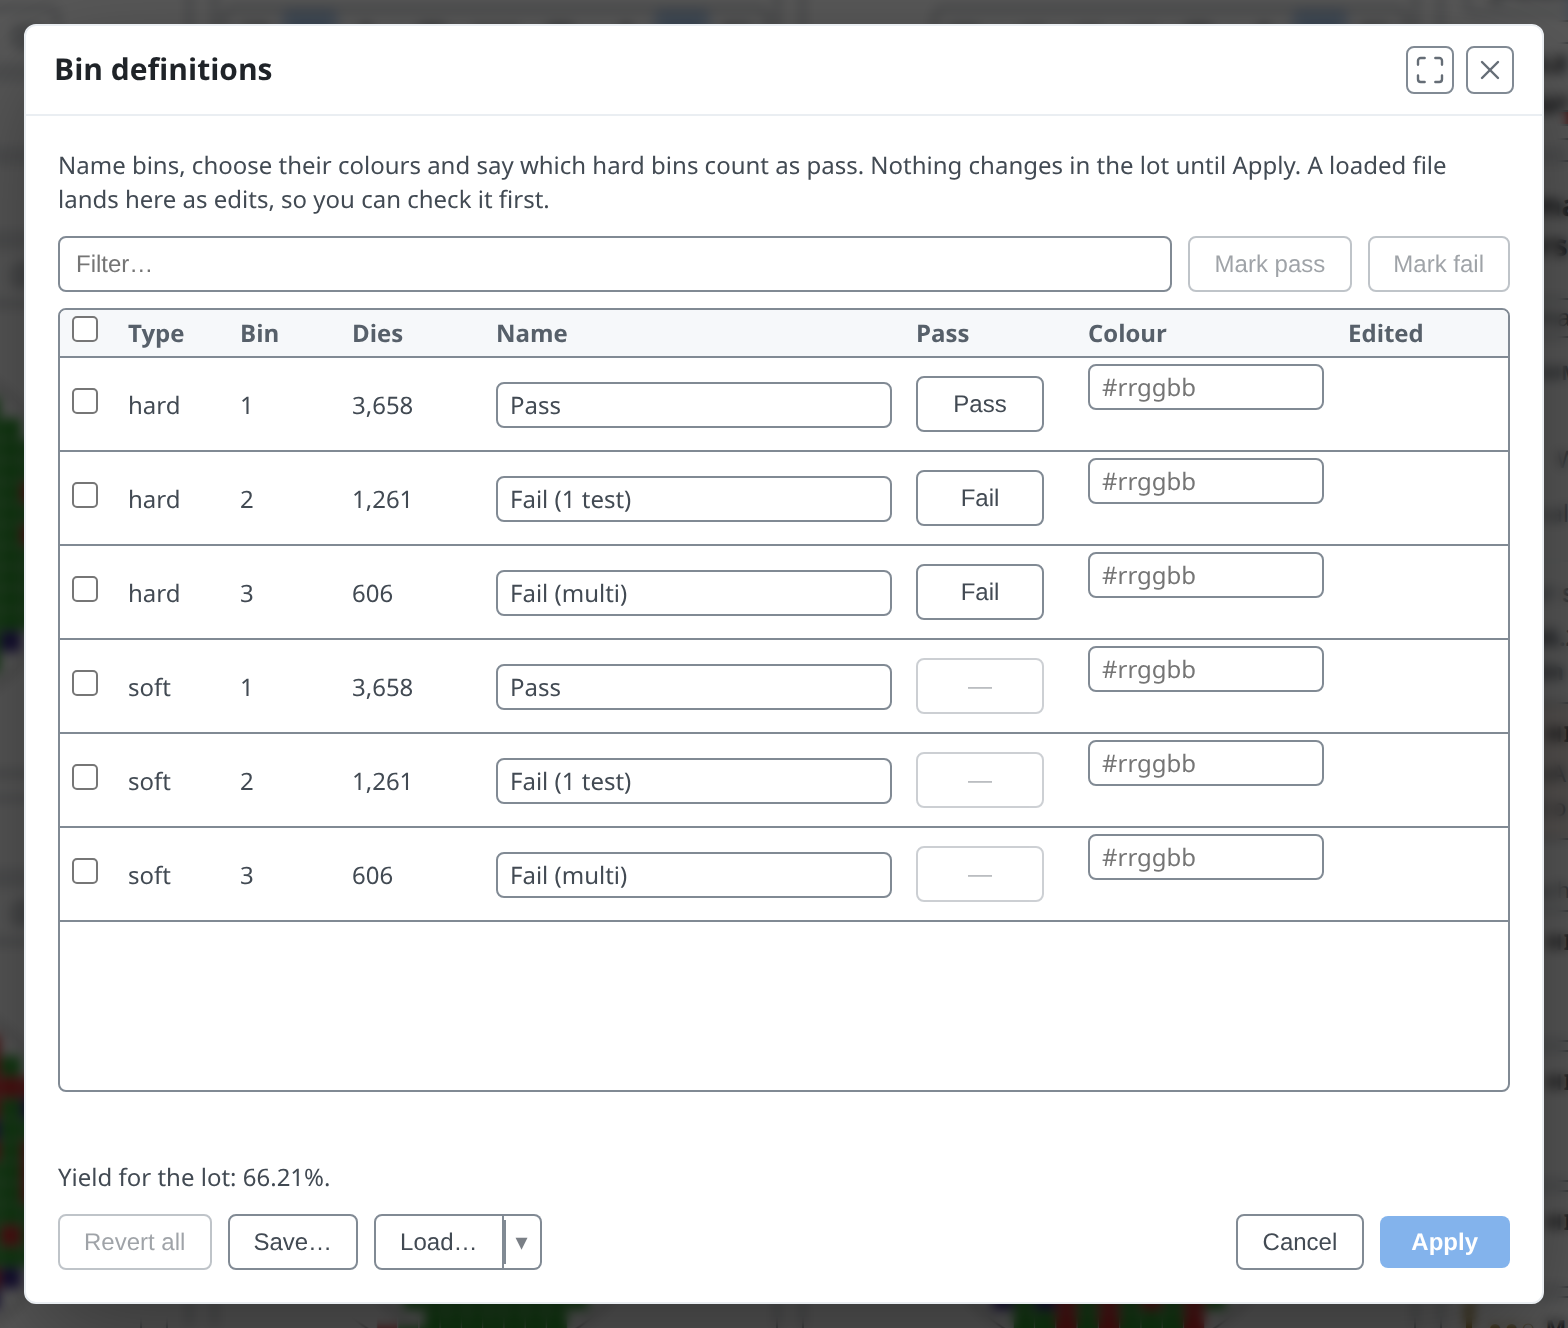
The Bin definitions table for the sample lot: three hard bins and three soft bins

Learn tsmap · 04 The lot view

Change what passes

1 Tick hard bins, then 2 Mark pass or Mark fail. Soft bins have no pass flag.

3 The window shows the lot's yield now and with the new pass bins: here 66.21% becomes 89.03% if bin 2 counts as a pass.

Hard bin 2 ticked and marked pass: the yield line shows both figures

Learn tsmap · 04 The lot view

Confirm a pass change

A changed pass flag changes the lot's yield and every finding, so Apply asks first, with both figures. Change pass bins goes ahead, Back returns to the table, and Cancel leaves the lot untouched. Files of bin definitions are in lesson 12.

The confirmation: lot yield goes from to 89.03%, and every finding, summary and report follows

Learn tsmap · 04 The lot view

One wafer in its own window

Learn tsmap · 04 The lot view

Detach a wafer

When one wafer needs a closer look, Open full view, the expand button in a card's header, detaches it into its own window with the full single-map toolbar.

A wafer card's header with the Open full view button outlined

Learn tsmap · 04 The lot view

Bring it back

When a wafer is detached, its card becomes a placeholder. Its Reattach to gallery button puts the wafer back; closing the window does the same.

The placeholder card, with the Reattach to gallery button outlined

Learn tsmap · 04 The lot view

Try it yourself

  1. Open EDGE-LOT-01 in the web app
  2. Plot mode → Stacked Hard Bins: on the Pass card, where is the count lower?
  3. Stacked Test Values, then Σ → Std Dev
  4. Back to Hard Bin: Select the same dies on every wafer, drag a box
  5. Setup ▾ → Splits…: tick W01 and W03, assign a name, then Clear all
  6. Setup ▾ → Bin definitions…: Mark pass on a bin, read the yield, Cancel
Learn tsmap · 04 The lot view

Check your results

  1. The Pass count drops in a ring at the wafer's edge, and the failing bins' cards show the same ring faintly. One wafer alone looks like scattered failures; stacked, the ring is plain.
  2. The window shows the lot's yield now and with the new pass bins. Cancel leaves the lot as it was.
Learn tsmap · 04 The lot view

Recap

  • Stacked modes turn a lot into one map per bin or test, so what repeats stands out
  • Select the same dies reads one region across every wafer
  • Splits name wafers the file doesn't, and show on every label
  • Bin definitions… names bins, colours them and chooses which hard bins pass, with the yield shown before you confirm

The next lesson moves from maps to charts, and compares groups of wafers such as these splits.

More in the wafer map guide

Learn tsmap · 04 The lot view

Next lesson

05 · Insights: where yield is lost →

Which wafers, bins and tests lose yield, and what divides it.

Learn tsmap · 04 The lot view