tsmap User Guide¶
tsmap loads semiconductor wafer map data from STDF, ATDF, CSV, JSON, and Parquet files and renders interactive yield maps, parametric heat maps, and statistical charts. It runs as a native desktop application on Linux, macOS, and Windows, and as a browser app at wafertools.github.io/tsmap/app/.
This guide covers opening files, column mapping, test filtering, splits, wafer-view integration specific to tsmap (dies with no reported position, value findings), how splits and metadata feed the Insights tab's grouping, and the command line. In the app, this guide continues straight into the full wafer map guide in the same window — the wafer map toolbar, its plot modes, and every Insights tab panel (yield, per-test pass rate, bin pareto, process capability, boxplot, histogram, wafer-to-wafer trend, correlation, scatter) are covered there, with no separate page to open. Reading this outside the app (e.g. the docs site), see the wafer map guide directly for that part.
1. Supported file formats¶
| Format | Extensions | Notes |
|---|---|---|
| STDF v4 | .stdf, .std |
Binary; PTR (parametric) and FTR (functional) records; multi-wafer lots |
| ATDF | .atdf, .atd |
ASCII equivalent of STDF; same data, same features |
| CSV | .csv, .txt, .dat |
Tab, semicolon, and comma auto-detected; wide and long (pivot) formats |
| JSON | .json |
Flat array of die objects or nested [{ wafer, results: [{die}] }] |
| Parquet | .parquet |
Columnar, typed; wide and long (pivot) formats, same as CSV/JSON. snappy, gzip, lz4, and brotli compression on both desktop and web; zstd on desktop only |
| Gzip | .gz |
Transparent decompression — e.g. lot.stdf.gz |
| Zip | .zip |
All contained files extracted and loaded as a batch |
STDF and ATDF are always parsed natively — never attempt to open them in a text editor or spreadsheet. CSV, JSON, and Parquet require a column mapping step before the data is parsed.
2. Opening files¶
Installing past security warnings¶
tsmap's installers are not code-signed, so your operating system may warn that the app is from an unknown or unidentified developer the first time you run it. This is expected — it reflects the absence of a paid signing certificate, not a problem with the app. The steps below let you install anyway. If you would rather not install at all, the browser version runs with no download.
Windows — SmartScreen shows a blue "Windows protected your PC" dialog when you run
tsmap-<version>-windows-x64.msi (or the -setup.exe installer). Click More info, then
Run anyway. The warning fades as more people install the app.
macOS — Gatekeeper blocks the app with "tsmap can't be opened because it is from an
unidentified developer." After mounting the .dmg
(tsmap-<version>-macos-apple-silicon.dmg for M-series Macs, -macos-intel.dmg for Intel)
and dragging tsmap to Applications, right-click the app in Applications and choose
Open, then click Open in the dialog. You only need to do this once. If macOS instead
says the app is "damaged and can't be opened" — common on Apple Silicon for downloaded
unsigned apps — clear the quarantine flag in Terminal:
xattr -dr com.apple.quarantine /Applications/tsmap.app
Linux — the .deb, .rpm, and .AppImage builds run normally; any warning is just a
browser download nag. For the AppImage, mark it executable first:
chmod +x tsmap-*-linux-x86_64.AppImage
./tsmap-*-linux-x86_64.AppImage

The colour theme picker sits at the right end of the toolbar, next to the help button. Choose Auto to follow your system's light/dark setting, or pick a theme explicitly. The list is grouped light-first:
- Light — Light, Light green, Solarized Light, Gruvbox Light, GitHub Light, Catppuccin Latte, High contrast.
- Dark — Dark, Nord, Solarized Dark, Dracula, Tokyo Night, GitHub Dark, Gruvbox Dark, Catppuccin Mocha.
Your choice is remembered. The theme applies to the whole app including the wafer map and its Insights charts, which follow tsmap's colours rather than keeping their own.
Open files¶
Click Open files in the toolbar to open a file picker. You can select one file or multiple files at once. On the desktop the picker opens a native OS dialog; in the browser it opens the browser file dialog.
The ▾ beside it answers the other half of the question — which file, or how to find it: Choose files… (the same picker), Scan a folder…, and, on the desktop, your recent files. Add files ▾ offers the same two ways of picking, for appending to what is already loaded.
Scanning a folder¶
When you have far more files than you want to load — a directory of hundreds of lots, say — you don't have to pick them in the file dialog at all. Point tsmap at the folder and let it tell you what's in there.
Both Open files and Add files carry a ▾ beside them offering Choose files… or Scan a folder…, so you can scan a folder whether you're replacing what's loaded or adding to it. The start screen also has a Scan a folder… button, and dropping a folder onto the window does the same thing (dropping files still loads them directly; a dropped folder always replaces, since a drag can't say "add").
However you get there, tsmap reads just the header metadata from every data file it finds: lot, part type, tester, program and whatever else the file carries, plus wafer and site counts for STDF/ATDF. No die data is read, so scanning a large batch is quick.
The table leads with what usually decides which files you want: the file's Name, its Lot, how many Wafers it holds, and when it was Tested — shown next to the file's Modified time, so a file copied long after testing stands out. Tested is the earliest wafer start time the tester recorded, or the lot's start time where no wafer times were recorded. It and the other optional columns appear only when at least one file has a value.
If the folder has subfolders, you're asked once whether to include them. They're left out by default — a recursive scan of a large tree is the one part of this that can take real time — and the scan stops at a safety limit on very large folders, saying so in the log rather than quietly showing you part of the answer.
The same table also appears when you pick a lot of files through Open files or Add files: over a handful, tsmap offers to filter them first.
The two dialogs deliberately ask different questions. The folder picker asks where to look; the table below asks which files you want. Whichever way you got here, whether the chosen files replace what's loaded or are added to it was already decided by the button you pressed — the table doesn't ask again.

The results appear in a table, one row per file, with a column for every metadata field found across the batch (alongside Name, Size and Modified). From there you can:
- Sort by clicking a column heading — click again to reverse, a third time to clear. Size and Modified sort by their real value, not by how they're written.
- Filter a column by clicking the ▾ in its heading and ticking the values to keep. Clear filters in the toolbar resets every column at once.
- Hide columns you don't care about with Columns ▾ — a batch can easily produce twenty-odd metadata columns. Hiding one only affects the display; if it has a filter set, that filter still applies (the picker marks it as filtered so you can tell).
- Resize a column by dragging the divider on the right edge of its heading. Columns auto-fit their content on each scan (filenames get the most room, since they are what the table exists to compare), but a column you have resized yourself keeps your width through the next scan rather than being re-fitted. The divider is focusable — Left/Right arrows resize it from the keyboard.
- Search across all columns with the search box.
- Select rows by clicking them — a click adds a row to the selection or removes it, and selected rows are highlighted. Shift-click a second row to apply the first row's state across everything between them — so shift-clicking after deselecting a row clears the range instead of selecting it. From the keyboard, ↑/↓ move between rows, Space selects or deselects, Shift+↑/↓ extends, Shift+Space extends to the focused row, and Ctrl/Cmd+A selects everything shown.
- Select all, Select none and Invert apply to the rows currently shown, so they respect the filter — as does Ctrl/Cmd+A, and as does a shift-click range.
Load selected… (or Add selected…, if you got here from Add files) takes the files you've ticked. It confirms first. The selected files then go through the normal load flow — column mapping, test selector, wafer rename and so on — just as if you had picked them directly.
Save filter… writes the current column filters and search text to a small JSON file, and Load filter… reads one back, re-selecting every row that matches. That makes a recurring selection ("this quarter's production lots") reusable across sessions and across different batches of files. If a saved filter names a column these particular files don't have, that column is ignored and the dialog says so, rather than quietly matching nothing.
If you pick more than five files through Open files or Add files, tsmap offers to route them into this table first, so you don't have to pick them twice.
Mixed formats are fine here. You can scan a directory holding STDF, CSV and Parquet
together — reading metadata doesn't care about the format, and a Format column appears
so you can sort and filter by it. A load still takes one kind of file, with STDF and ATDF
counting as one (they are the same records, binary and text) — so STDF and ATDF load
together, but not with CSV, JSON or Parquet, which share one column mapping per load. When
the scan holds more than one kind, buttons above the table choose between them; the dialog
also tells you if a selection still mixes kinds, and stays open so you can adjust. Zip
archives are expanded and their contents scanned individually, and .gz files are read
straight through.

Loading sample data¶
The empty state has a Load sample data button that loads a bundled synthetic lot — 13 wafers across 5 process corners — through the normal load flow (test selector included), so you can see tsmap working before opening your own files. Available on both desktop and browser. Its process-corner splits apply automatically, so the loaded lot is ready to explore with Group by → Split right away.
Drag and drop¶
Drop one or more files anywhere in the window. This is equivalent to selecting them through the file picker and is supported on both desktop and browser — the start screen says so, and the toolbar repeats it once data is loaded (on a wide enough window; the hint is dropped on narrow ones so the controls to its right stay reachable).
Dropping a folder scans it instead, exactly as Scan a folder… does. That part is desktop-only: a browser hands a dropped item's contents to the page and not its location, so there is no folder for the web build to walk. Drop a folder in the browser and tsmap says so — "a browser cannot read a dropped folder. Drop the files inside it, or use Scan a folder…" — rather than failing to parse something named after your directory. Files dropped alongside a folder still load; only the folder is skipped.
Recent files¶
Desktop only. The last 8 file sets you've opened are listed under Open files ▾, below
Choose files… and Scan a folder…, each showing when it was last loaded (Today 14:32,
Yesterday 09:05, or a date for older entries). They also appear on the start screen, where
there is room to show them without opening a menu.
Click an entry to reopen it — this replaces the current view the same way Open files does, so it is not a way to append, which is why recents are not offered under Add files ▾. Click the × beside an entry to remove it from the list.
They are reachable whether or not a file is currently loaded, since the caret is always available. Not shown in the browser version: reopening needs a native file path, which browser file pickers do not provide.
Command line¶
Desktop only. Launch tsmap with files already named, for scripting or automation:
tsmap lot1.stdf lot2.stdf                  # one or more data files
tsmap --list files.txt                     # a text file of paths, one per line
cat files.txt | tsmap                      # or piped via stdin
tsmap lot1.stdf --tests my-tests.csv       # pre-fills the test selector (still shown — see below)
tsmap lot1.stdf --splits my-splits.csv     # applies splits automatically, same as sample data
tsmap lot1.stdf --wafer-diameter 300       # sets the wafer diameter (mm) for this launch
tsmap lot1.stdf --wafer-diameter 300 --edge-exclusion 3   # plus an edge-exclusion band (mm)
tsmap --url https://.../lot.stdf --url-format stdf   # fetch and open a URL — see below
tsmap --help                               # full usage
tsmap --version                            # print the version and exit
--tests takes the same file a test selector's Save definitions button produces — selection,
renames, and optionally spec limits/test type (see
Test definitions above) — and --splits the same CSV the
Splits… dialog saves and loads. --tests only
pre-fills the selector's checkboxes, renames, and limit/type overrides — the overlay still
always appears and still needs a confirm click, the same as any other load; it just saves
re-picking (and re-entering limits for) tests you already set up before.
--wafer-diameter/--edge-exclusion set the same values as the
Diameter & edge exclusion… dialog — a bare number in mm,
not a file path. --edge-exclusion only takes effect once a diameter is known, from
--wafer-diameter in the same launch or one already persisted from a previous session; given
with no diameter available from either source, it's ignored with a logged warning rather than
silently applied against whatever tsmap would otherwise infer.
If tsmap is already running, launching it again with files hands them to the running window instead of opening a second blank one: with nothing currently loaded they open right away; with data already loaded, a dialog asks whether to replace it. Decline and the new files open in a separate, independent tsmap window instead, so nothing is lost either way.
Opening data from a URL¶
Another application can hand tsmap a data URL directly, so it can fetch and load the file itself with no one retyping anything. This is aimed at a caller application that already knows where the data lives (its own database or API) — not at typing a URL in by hand. On desktop, the fetched response is briefly materialised as a temporary local file while it's loading (so it can flow through the same load pipeline as any other file); no data is uploaded to a tsmap service either way. In the browser build there's no local filesystem to write to, so the fetched bytes stay in memory.
On desktop, pass it on the command line, paired with the format:
In the browser, encode it in the page URL instead:
The format can also be zip: tsmap unpacks it and loads every file inside, exactly as if they
had been opened together. To send several STDF or ATDF lots from one URL, a zip with one file
per lot is the recommended form: each file keeps its own lot record and bin definitions. A
CSV, JSON or Parquet response can hold several lots in one table; map its lot column (see
the column mapping table below).
Or, to launch the desktop app directly from a web page (rather than requiring a script or
terminal to run the command above), a tsmap:// link works the same way once the desktop app
has been run at least once on that machine (which registers it as the link's handler):
<a href="tsmap://open?url=https%3A%2F%2Fexample.com%2Flot.stdf%3Fsig%3D...&format=stdf">
  Open in tsmap
</a>
Enabling the tsmap:// handler. On Linux and Windows, tsmap registers itself as the
handler for the tsmap:// scheme every time it starts — installed via .deb/.msi or run
as a raw dev/portable binary, the effect is the same, and nothing needs to be configured by
hand. On macOS the registration instead comes from the app bundle at install time (via
Info.plist), so it's already in place the first time the app is launched, and there is no
separate runtime registration step. Either way, the practical rule is the same: run tsmap
at least once on a machine before a tsmap:// link there will do anything. The first time
a browser follows one of these links it will normally show its own "Open tsmap?"-style
confirmation prompt — that's the browser guarding external-app links in general, not
anything tsmap controls, and it typically offers a "always allow links from this site" option
so the prompt doesn't reappear.
Try both launch paths — including the tsmap:// one — with real sample data on the
live demo.
All three forms need the format spelled out explicitly (stdf, atdf, csv, json, or
parquet) — tsmap doesn't guess it from the URL. Once fetched, the file goes through the
exact same load as opening it locally: column mapping for CSV/JSON/Parquet, the test
selector for STDF/ATDF.
The dataUrl/dataFormat params are removed from the address bar right after the fetch is
attempted, so reloading the page won't re-trigger it.
Authentication¶
Browser build: no credentials are ever sent. tsmap does a plain, unauthenticated fetch — the URL itself must be self-authenticating (a presigned/signed link with the token already embedded), since there's no secure way for tsmap to accept a separate secret here — the page URL can end up in browser history, bookmarks, or a server's access log.
Desktop: --url-headers <FILE> sends custom headers with the fetch — e.g. an
Authorization bearer token for a data API that expects header-based auth rather than a
presigned link. Point it at a small text file, one header per line:
# auth.txt — blank lines and '#' comments are skipped
Authorization: Bearer eyJhbGciOiJIUzI1NiIs...
X-Api-Key: abc123
The header value never appears on the command line itself (so it won't sit in shell
history or a process list the way a --header "Authorization: ..." flag would) — only the
file path does. The file itself is still plain text on disk, exactly like the --tests/
--splits files already are; tsmap doesn't encrypt it or integrate with an OS credential
store. --url-headers requires --url; a malformed line (missing the : separator) or an
unreadable file fails the fetch immediately with a clear error rather than silently sending
an unauthenticated request. There's no browser-build equivalent — see the CORS section below
for why a header-based secret can't safely travel through a page URL.
The tsmap:// link has the same constraint as the browser build, not the same option as
--url-headers. A link URL — page URL or deep link — has nowhere safe to carry a header
value either, so tsmap:// links only work with a self-authenticating URL, the same as
?dataUrl=. --url-headers remains a local file the launching machine already has; there's
no way to pass its content through the link itself.
Browser build: the data server must allow cross-origin requests (CORS)¶
This only applies to the browser build's ?dataUrl= — the desktop app's --url never
hits this, see below.
Every browser enforces a rule called CORS (Cross-Origin Resource Sharing): a web page can only read the response from a different website's server if that server explicitly says it's OK. "Different website" is decided purely by the address — scheme, hostname, and port — never by network location. Being on the same office network, the same VPN, or even the same machine on a different port does not help — tsmap's page and the data server are still two different "origins" as far as the browser is concerned, and the browser blocks the read by default regardless of how reachable the server actually is.
Concretely: if tsmap is served from https://tsmap.example-corp.internal/ and the data URL is
https://wafer-data-api.example-corp.internal/lot123, the browser will refuse to hand the
response back to tsmap's JavaScript unless the data API's response includes a header like:
(or Access-Control-Allow-Origin: * to allow any site — simpler, but only appropriate if the
data behind that URL isn't sensitive to being fetched by any web page that knows the link).
Whether this is easy depends entirely on whether you control the data API:
- If you (or your team) run the API: this is normally a small, one-time config change —
a line of middleware (e.g. Express's
cors()package, Flask-CORS), or a header directive in the reverse proxy / API gateway in front of it (nginx'sadd_header, an API gateway's CORS setting). tsmap only ever sends a plainGETwith no custom headers, which keeps this to the simplest CORS case — no separate preflight request to also allow. - If it's a third-party or legacy API you can't change: the browser build's
dataUrlpath won't work against it, full stop — there is no per-request workaround, and tsmap cannot disable or bypass this check (it's enforced by the browser itself, not by tsmap). Use the desktop app's--url/--url-formatinstead — the fetch happens inside the desktop app's own Rust process, never inside a browser page, so CORS simply doesn't apply there.
If a dataUrl fetch fails, the log panel names CORS explicitly as a likely cause — that's the
first thing to check with whoever owns the data API.
File associations (desktop)¶
Help → File associations… lets you open .stdf, .atdf, and .parquet files in tsmap
automatically by double-clicking them in a file manager (Windows Explorer, GNOME Files,
Dolphin, etc.). CSV and JSON aren't offered here on purpose — those extensions are already
claimed by dozens of unrelated apps, and quietly becoming their default handler would be an
unwelcome surprise even behind a checkbox.
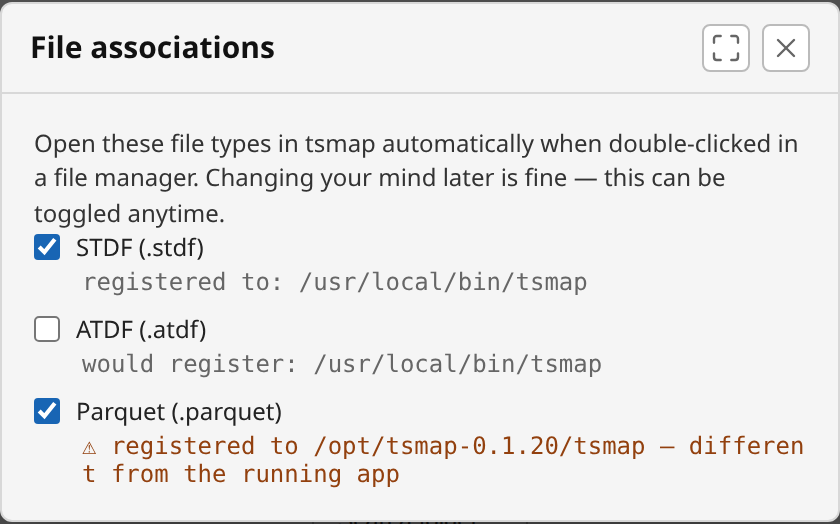
Each file type is a separate checkbox, and nothing is associated until you turn one on — this is never set automatically. It's a setting, not an installer choice, so you can change your mind at any time without reinstalling; toggling a checkbox off removes the association immediately.
If a checkbox fails to turn on, the dialog shows the reason inline rather than silently reverting. The most common cause on a managed/corporate machine: registry write access (Windows) or the relevant config directory (Linux) is restricted by IT policy — in that case file-type association simply isn't available on that machine, and there's no in-app workaround. This has nothing to do with tsmap's own permissions; it's the same restriction that would block any application from registering a default handler there.
Each row also shows the executable path currently registered for that file type — or, when unchecked, the path that would be registered if you turned it on. This is what the OS will actually launch on a cold double-click, which can silently drift from the tsmap you're running right now (for example, if the association was last turned on while running a development build) — a mismatch is flagged inline rather than left to be discovered as a launch failure.
Not available in the browser build — there's no equivalent to "the OS's default app for a file type" a web page can register.
Adding files to an existing lot¶
Once a file is loaded, the Add files button becomes active. Use it to append additional wafers to the current gallery — it goes through the same column mapping / test selector / rename steps as a fresh load, then shows a confirmation dialog before merging into the current gallery:
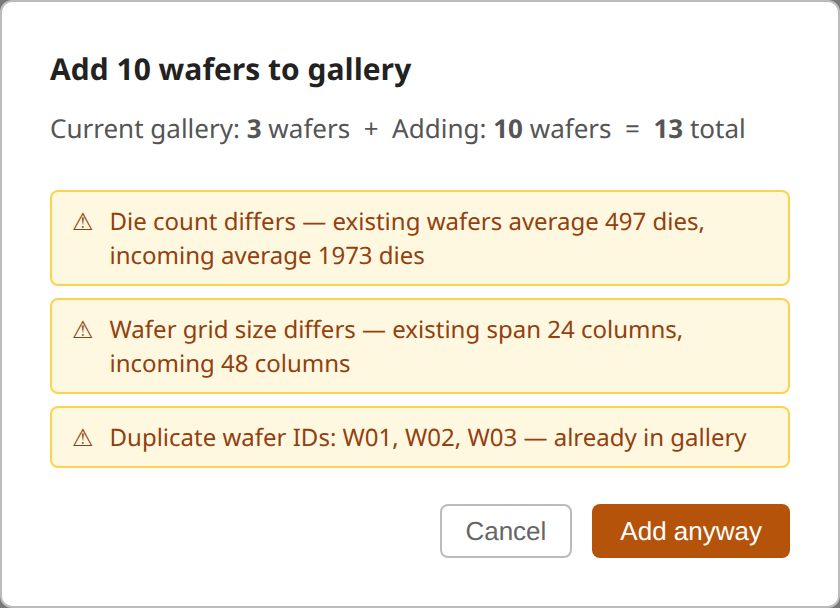
The dialog summarises the incoming wafers and warns about structural mismatches (different die count, different hard bin set, duplicate wafer IDs). With no mismatches, the button reads Add to gallery; if there's a warning to acknowledge, it reads Add anyway. Click Cancel to keep the current data unchanged.
Clearing data¶
Click Clear to unload all data and return to the empty state.
What happens next¶
After selecting files, what happens depends on the format:
| Format | Next step |
|---|---|
| STDF / ATDF | Test selector overlay always appears first |
| CSV / JSON / Parquet | Column mapping overlay appears first |
| Multiple files | Wafer rename overlay appears before rendering |
2.1 Wafer rename overlay¶
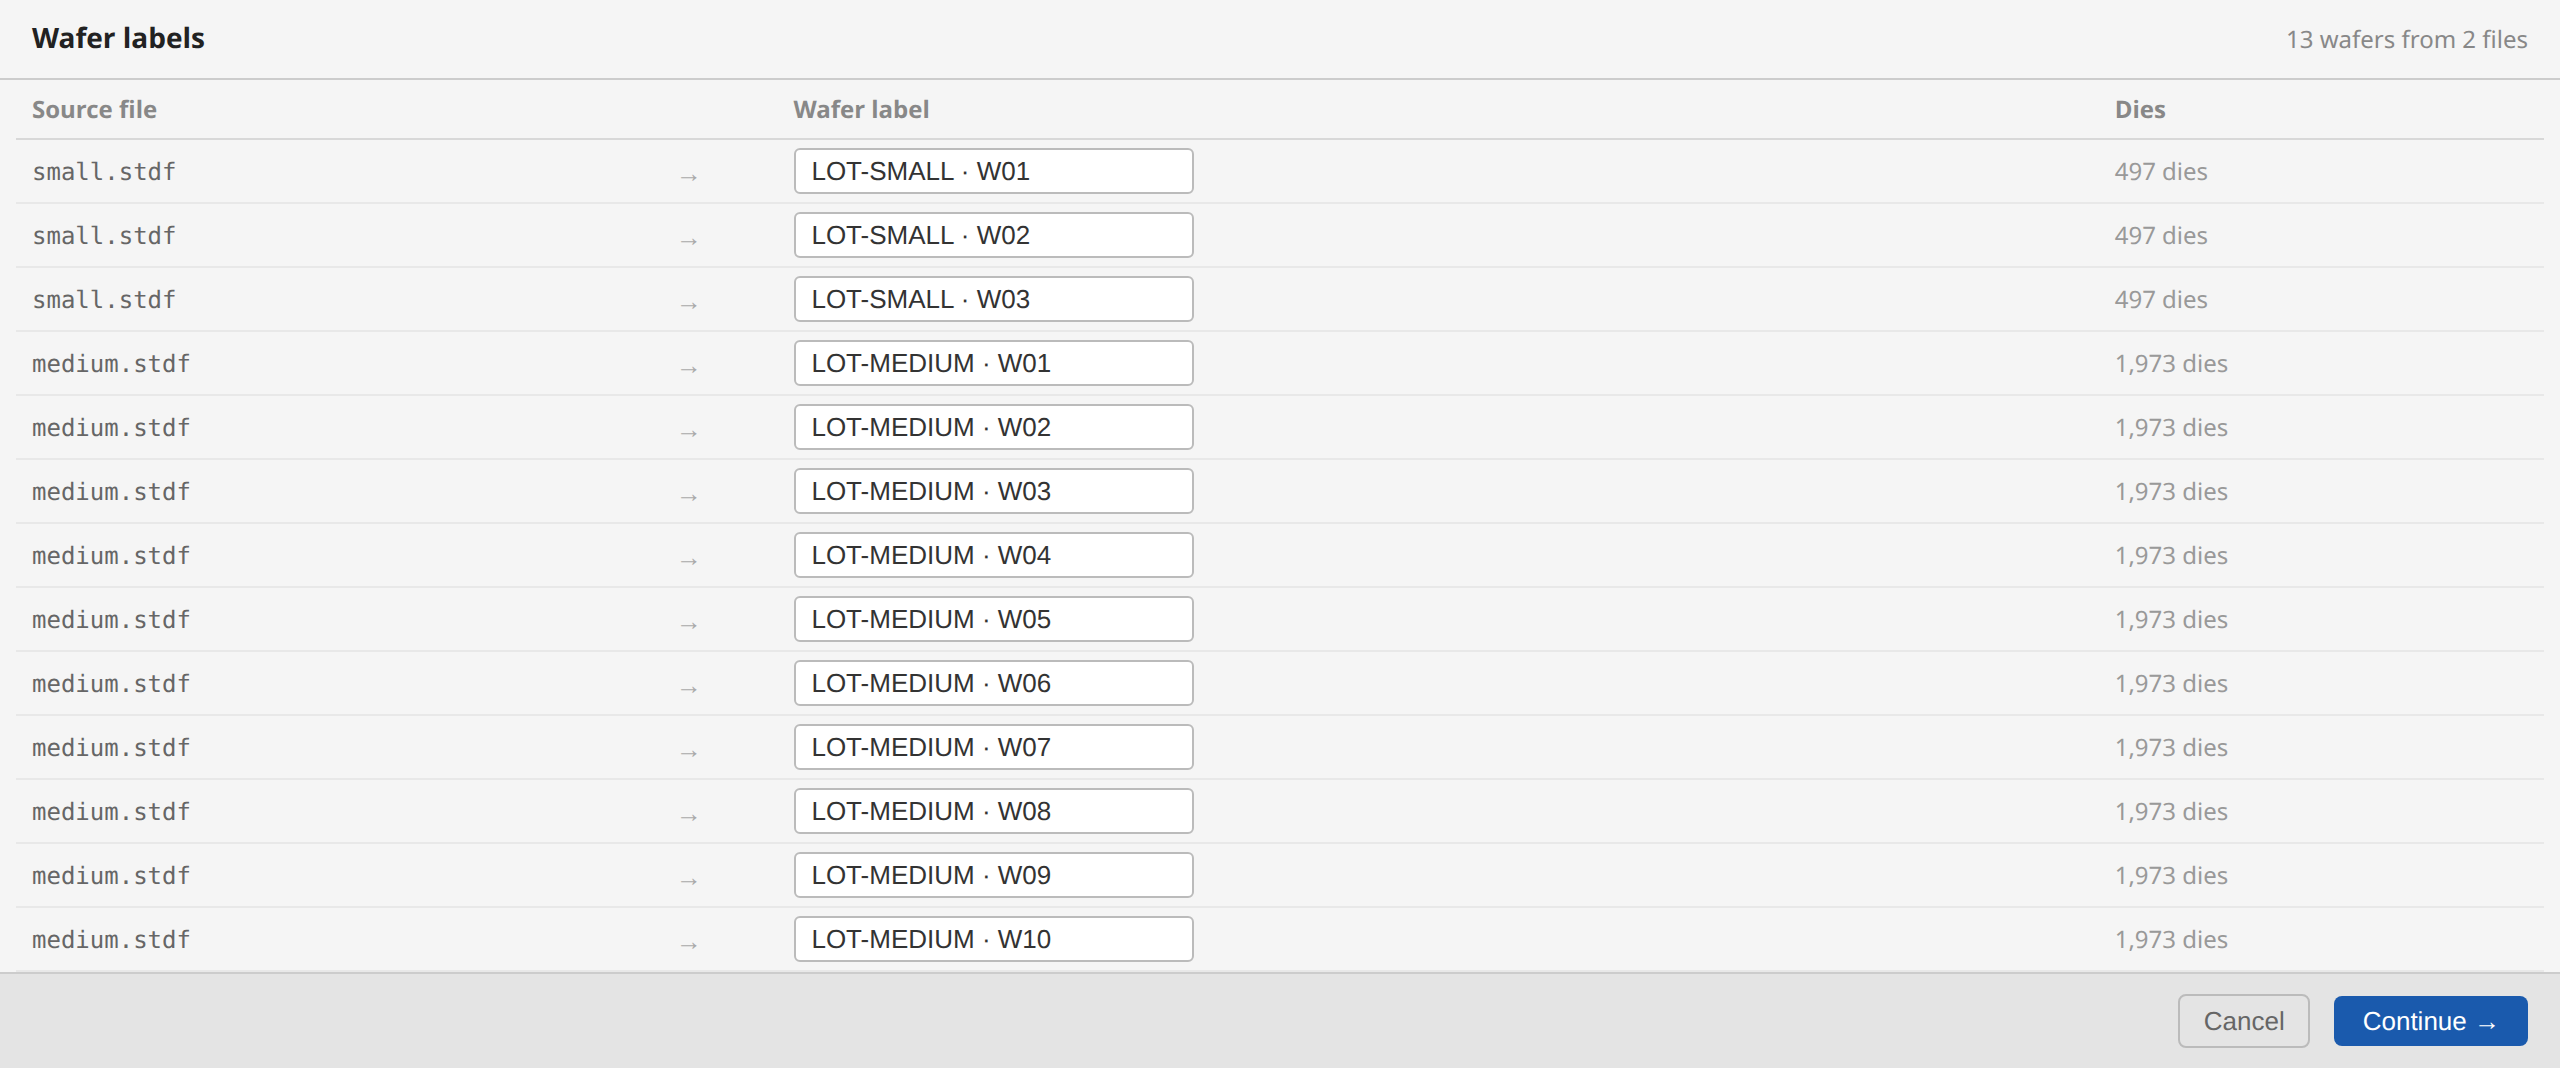
When loading multiple files (or a zip containing multiple files, or a single file whose
only wafer has a generic ID like W01 and no lot ID to go with it), tsmap shows a rename
overlay listing each wafer
with an editable label. Labels are pre-filled from whatever identifies the wafer in the
data — a distinctive wafer ID is used as-is; a generic one (W01) is combined with the
lot ID (LOT-A · W01) so wafers stay distinct within and across lots without you needing
to edit anything; with neither, it falls back to the file name. Edit any label that needs
changing, then click Continue →.
3. Column mapping (CSV, JSON, and Parquet)¶
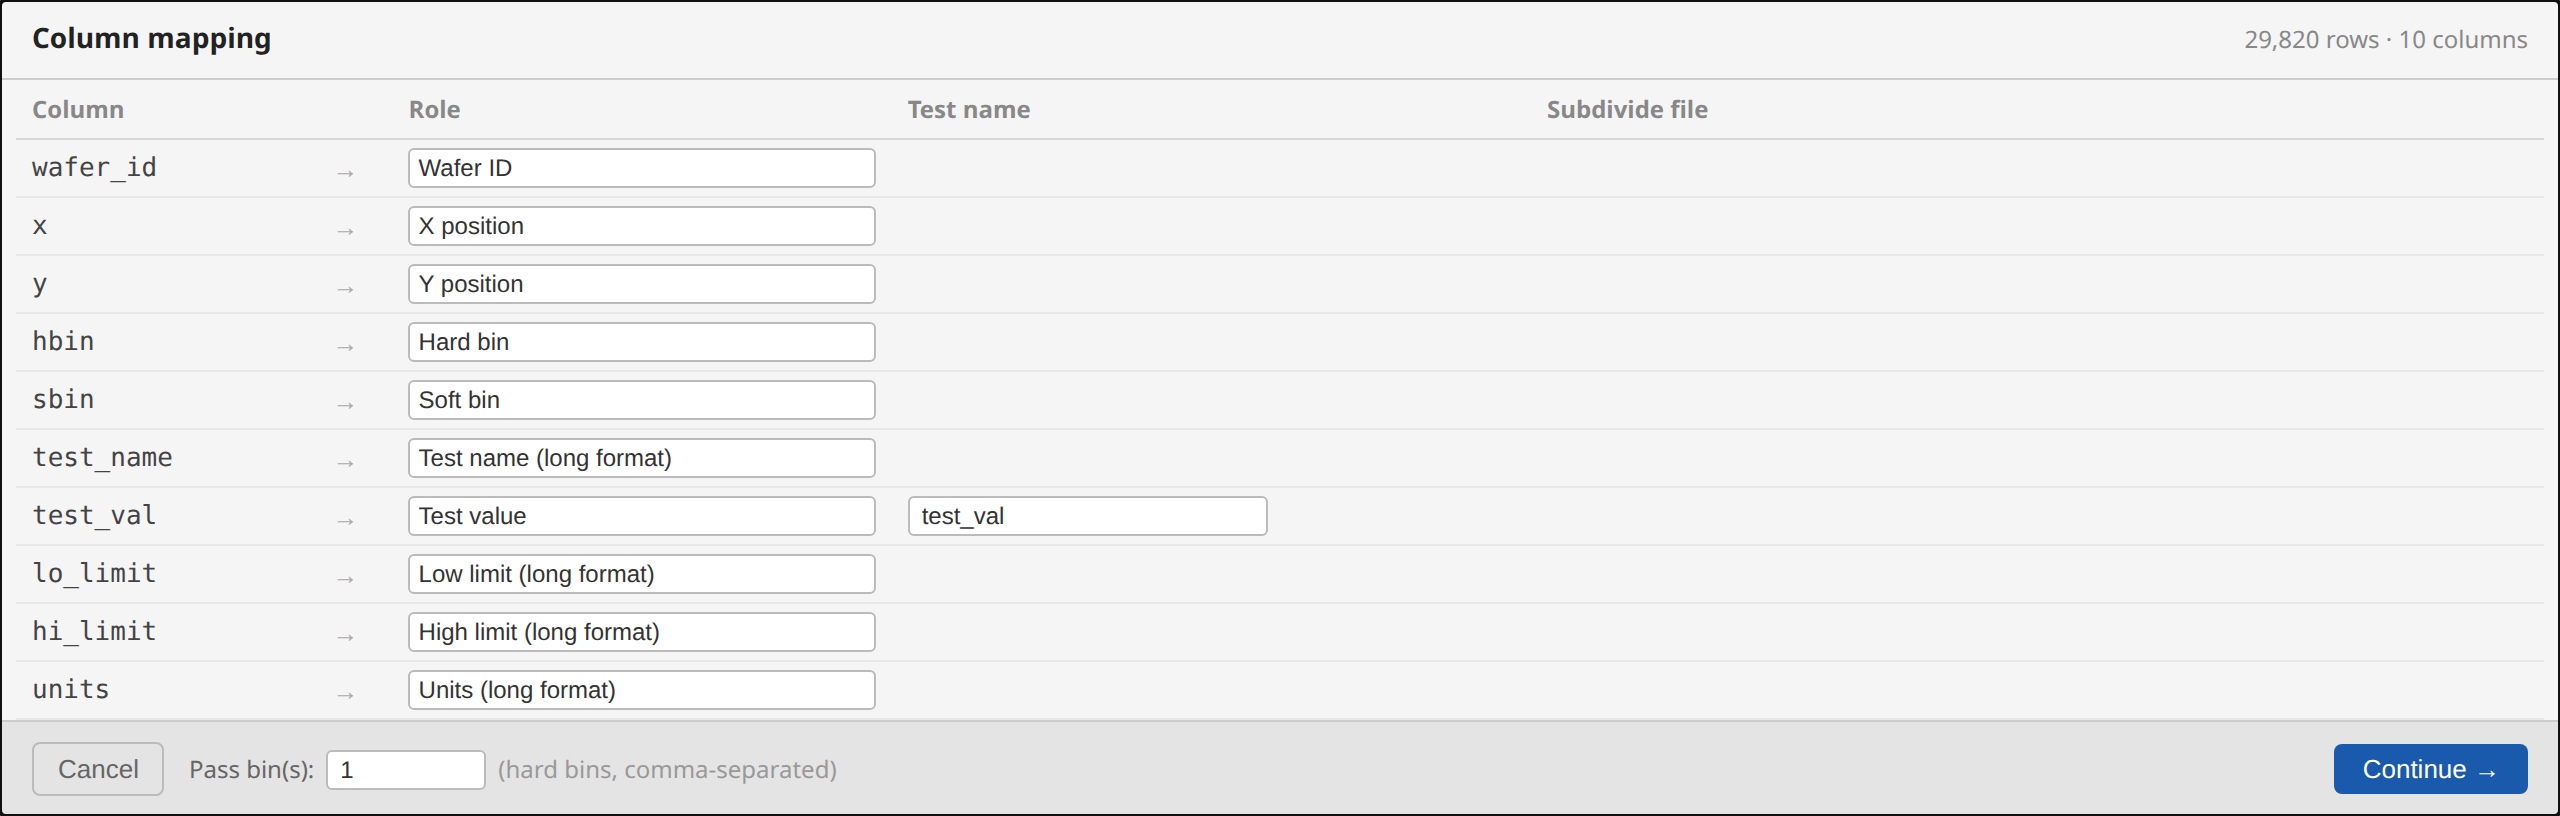
CSV and JSON files don't have a fixed schema, and Parquet files carry an arbitrary schema
of their own, so tsmap shows a column mapping overlay before parsing any of the three. It
lists every column in the file with a dropdown to assign its role. Common column names
(x, hbin, result, lo_limit, etc.) are detected automatically and pre-filled.
Parquet columns are typed (numbers, text, booleans) rather than plain text like CSV/JSON
cells, so the overlay adds one thing on top: a ⚠ next to a column's role dropdown if
you assign a numeric-only role (X position, Y position, Hard bin, Test value, etc.) to a
column whose values are actually text. This is a hint, not a hard stop — a numeric-looking
text column (e.g. "42") still parses fine — but it catches an obvious mismatch (e.g.
mapping a wafer-ID text column to X position) before a full parse silently produces empty
or wrong results.
Role reference¶
| Role | What it means |
|---|---|
| X position | Die column coordinate (prober step, integer). Optional — see Dies with no reported position below. |
| Y position | Die row coordinate (prober step, integer). Optional — see Dies with no reported position below. |
| Hard bin | Hard bin number per die |
| Soft bin | Soft bin number per die |
| Wafer ID | Identifies which wafer each row belongs to; splits rows into separate wafer maps |
| Lot ID | Lot identifier. Map it whenever the file can hold more than one lot: each wafer is identified by lot and wafer ID, so two lots' W01 stay two separate wafers. |
| Test site | Parallel-test site number for each die (the STDF site_num equivalent). Dies from all sites share one wafer map; the site appears in the die hover tooltip and can be used as a chart grouping/colour dimension. Numeric values only. |
| Test value | Numeric test result (wide format — one column per test); the Test name field to the right sets the display name for that test. If the column's own header is itself a bare number (e.g. 1001), that real number is used as the test's identity instead of a generated one |
| Test name (long format) | Column containing the test name in a long/pivot layout. Optional if Test number is set instead — a file with only real test numbers and no descriptive names is fully supported; the number is used as the display name in that case |
| Test number (long format) | Column containing the test's real number in a long/pivot layout. Optional alongside Test name — set alone (no name column at all) or together (real number, given name). At least one of Test name/Test number is required, along with Test result |
| Test result (long format) | Column containing the numeric result in a long/pivot layout |
| Low limit (long format) | LSL in a long-format file |
| High limit (long format) | USL in a long-format file |
| Units (long format) | Units string in a long-format file |
| Display info | Additional metadata captured for grouping/comparison (and shown in tooltips). Values are recorded per wafer, so a file mixing temperatures or test programs labels each wafer with its own. If the same wafer appears more than once — tested at two temperatures, say — and one of these columns tells the passes apart, each pass becomes its own wafer map, and the log says which column did it; with nothing to tell them apart the repeats are treated as retests. A column whose value changes within a wafer (a per-die timestamp) is not shown as a wafer property, and the log says so. The Subdivide file by this column checkbox is a structural escape hatch for flat files that pack several wafers into one file with no wafer column — it subdivides the file into one wafer map per distinct value of the column. (Do not use it for parallel-test sites — map those to Test site instead.) |
| — ignore — | Column is not imported |
Wide vs long format¶
Wide format has one column per test (the most common layout from prober exports). Assign each test column the Test value role and fill in the test name.
Long format has one row per die per test (each row includes a test identity column and a result column). Assign Test result (long format), plus Test name (long format), Test number (long format), or both — a file that only has real test numbers and no descriptive names works just as well as one with only names; assigning both uses the real number as the test's identity paired with the given name. Optionally assign the limit and units columns too. tsmap detects likely long-format files automatically and shows a prompt if multiple rows share the same X/Y coordinates.
Examples:
Wide format — one column per test:
x, y, hbin, Vt_lin, Idsat_vg1
1, 1, 1,    452,    185
2, 1, 2,    438,    179

Long format — one row per die per test:
x, y, hbin, test_name,  result
1, 1, 1,    Vt_lin,     452
1, 1, 1,    Idsat_vg1,  185
2, 1, 2,    Vt_lin,     438
2, 1, 2,    Idsat_vg1,  179
Dies with no reported position¶
X/Y aren't required. Leave both unassigned and every die in the file is treated as having no reported position — a confirmation explains what that means (see Dies with no reported position below) before you continue. Assigning only one of X/Y (not both) is blocked — a die is either fully positioned or fully unpositioned, never half.
A row whose X or Y cell is blank or doesn't parse is handled the same way individually: kept
as a coordinate-less die rather than dropped, even if most of the file's other rows do have a
position (a "mixed" wafer). sample_data/TESTNUM-COORDLESS-01.{csv,json,parquet} demonstrate
this — the same three-wafer lot in all three formats, one wafer fully positioned, one mixed,
one fully coordinate-less. STDF and ATDF have the same rule applied to their own "no reported
position" conventions (the STDF sentinel value and ATDF's blank PRR X/Y fields respectively);
sample_data/COORDLESS-LOT-01.stdf and sample_data/COORDLESS-LOT-01.atdf are their fixtures.
Pass bins¶
The Pass bin(s) field at the bottom of the overlay specifies which hard bin values are
treated as pass for yield calculation. Default is 1. Enter multiple bin numbers separated
by commas (e.g. 1,7).
CSV/JSON/Parquet have no equivalent of STDF/ATDF's HBR/SBR records, so bins have no names — just numbers — unless you supply them. The Load bin definitions… button next to the Pass bin(s) field loads a bin-definitions CSV (real hard/soft bin names, and pass/fail flags that override this field) before you continue. See Bin definitions below for the file format, and for STDF/ATDF's own version of this (overriding what HBR/SBR already supplied, once loaded).
Saved mappings¶
Once you click Continue →, the mapping is saved and automatically restored the next time you open a file with the same set of column names. If the columns have changed, the overlay re-appears with fresh auto-detection.
4. Test selector (STDF and ATDF)¶
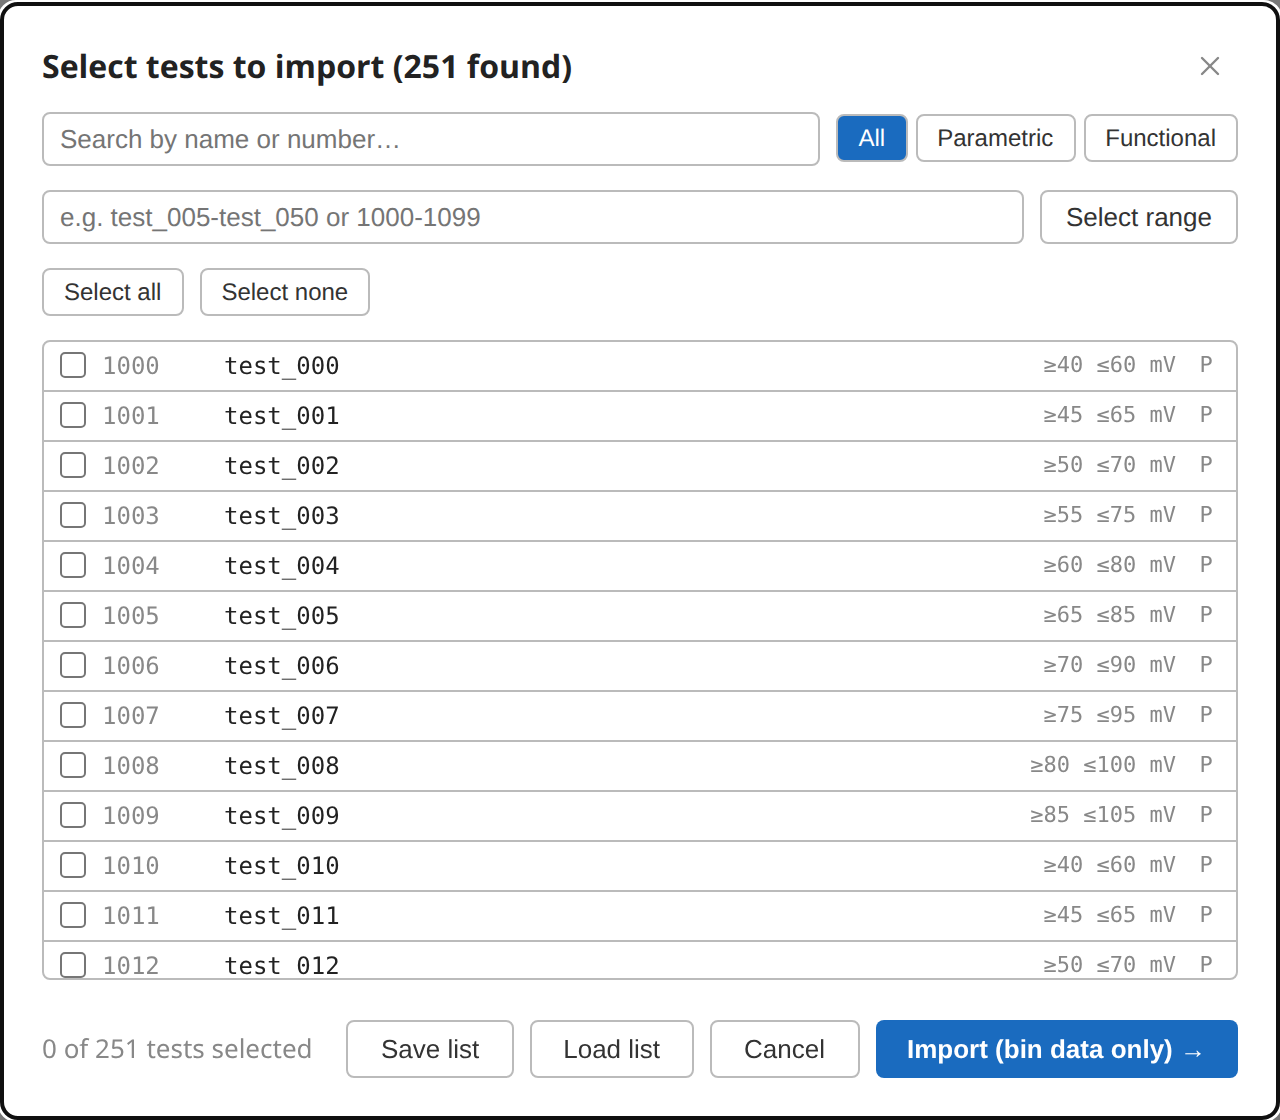
STDF and ATDF files from production testers often contain hundreds of parametric and functional tests. tsmap always shows a test selector overlay before the full parse so you can choose which tests to import. This keeps memory usage and load time proportional to what you actually need.
tsmap uses a two-pass approach: a fast first pass reads only the test record headers (PTR/FTR) to enumerate all tests and their numbers, names, units, and spec limits — without accumulating any die data. The selector is built from this scan. The full parse then runs only for the tests you selected, skipping accumulation for everything else. For a 25-wafer lot with 500 tests and 10 000 dies per wafer, selecting 20 tests instead of all 500 reduces the in-memory dataset by roughly 25×.
Controls¶
The first row narrows what you see; the second row selects from what's shown.
- Search — Filter the list by test name or test number. Results update as you type.
- Type filter — Show all tests, only Parametric (PTR), or only Functional (FTR). The count per type is shown on each button.
The three controls in the second row all act on the tests currently listed, so a search or type filter narrows what they can reach:
- Select all / Select none — Tick or untick everything currently shown.
- Range select — Type a numeric range (
1000-1099), a name-based range (Idsat_vg1-Idsat_vg5), or a comma-separated mix of ranges and single tests (1001-1010, 1050, vth_n), then press Enter or click Select range. A name range runs between the first and last match in list order, not alphabetically. Because it only reaches shown tests, a range naming real tests can select fewer than you expect — the dialog says so when that happens, and tells you how many the filter is hiding. - Shift-click — Click one checkbox, then Shift-click another to select or deselect the entire range between them. Which of the two it does follows the first checkbox: tick it and the range is selected, untick it and the range is cleared. From the keyboard, Shift+↑/↓ extends, Shift+Space extends to the focused row, and Ctrl/Cmd+A selects every test currently shown.
Each test row shows the test number (in dim monospace), the test name, and — where defined
in the file — the units and spec limits. If a Load definitions (or --tests) has overridden a
test's limits, units, or type, the row shows those overridden values, with a tooltip noting
they were loaded from file.
Renaming a test¶
Click into a test's name to edit it directly — the field looks like plain text until you hover or focus it. Press Enter or click away to commit the new name; press Esc to discard the edit and restore the previous name. Renaming only changes the display name — nothing in the underlying data file changes — and the new name appears everywhere that test is shown: the selector, the map tooltip, and chart axis labels. Renames persist across Setup ▾ → Tests… re-opens and are included when you Save definitions.
Test definitions (Save / Load)¶
The Save definitions and Load definitions buttons let you persist a selection and reuse it across sessions or files from the same product. Beyond just the selection and display names, a test definitions file can also carry spec limits and test type — useful when a test program ships without limits (common for characterisation/test-vehicle work, where limits come from simulation or are defined and adjusted separately), or when you need to correct a test's parametric/functional classification.
Saving writes a plain-text .csv file with every selected test's number, current display
name, and current effective limits/units/type. Loading reads that file back, restores the
selection, and applies whatever the file specifies as overrides on top of the parsed data —
so renamed tests stay renamed, and any loaded limits/type replace what the test program shipped
with (or fill in limits it didn't have at all).
Recently used definitions files¶
If you follow a product or test-program series, you are likely to reload the same definitions file for every dataset. Load definitions has a ▾ beside it listing the files you have loaded or saved recently, so you can reapply one in a click instead of walking the file picker each time. The same list appears on the Load… button in Setup ▾ → Tests… and Bin definitions…; each type keeps its own list, so a bin-definitions file is never offered where a test-definitions file belongs.
Each entry shows the filename and when you last used it. What a recent entry gives you differs between the desktop and browser builds, and the difference matters — read this once:
- Desktop — the file is re-read from disk, so you always get its current contents. If it has changed since you last used it, that is noted in the log. If it has been moved, renamed, or sits on a share that is no longer mounted, the copy remembered at the time is used instead and the log says so.
- Browser — a browser's file picker hands the page a file's contents, never its location. There is therefore nothing to re-read, and no way for tsmap to tell whether the file on your disk has since changed. A recent entry in the browser is the copy taken when you last loaded or saved that file — the menu says so above the list, and each row dates the copy.
Why that matters for spec limits. A test-definitions file can set limits, and limits decide which dies read as out of spec, what the capability figures are, and where the limit lines are drawn. Applying a superseded copy produces numbers that look entirely normal and are wrong. So in the browser, when you reapply a remembered file that sets limits, tsmap says so in the log — naming the file, how old the copy is, and that it could not be checked.
If the file may have changed, use "Choose a file…" and re-pick it. That costs one extra dialog and replaces the remembered copy, so the next reload is current again. The desktop build has no such caveat: it always reads the file itself.
A note on names: in the browser, entries are identified by filename alone, since there is no
path to tell two files apart. Two different files both called limits.csv will occupy one entry,
the more recent replacing the other. On the desktop they are distinct entries with their full
paths shown.
The list holds the six most recent files of each type, and lives in your browser or app profile — not in the data, and not on any server.
The saved format is one test per line, with a header naming the columns:
# tsmap test definitions
# Saved: 2026-06-15T10:00:00.000Z
num,name,loLimit,hiLimit,units,testType
1000,Idsat_vg1,0.1,1.5,mA,P
1001,Idsat_vg2,,,mA,P
1010,Vt_lin,,,,
- Lines starting with
#are comments and are ignored on load. - Legacy format (still fully supported):
<test number> <display name>, with the number and name separated by a comma, semicolon, or plain whitespace, and no further columns. A line with just a number selects that test without overriding its name. Old saved files keep working unchanged. - Extended format: comma-separated, optionally starting with a header row that names each
column. Column names are matched case-insensitively, and common synonyms are recognized —
lsl/usl(orlo/hi,low/high) for the limit columns,typefor test type. A header lets you list columns in any order, and omit ones you don't need — for example a pure limits file with no name column at all,num,lsl,usl, is valid. Without a header, comma-separated rows are read positionally asnum,name,loLimit,hiLimit,units,testType. testTypeacceptsP/p(parametric) orF/f(functional).- Limits only make sense for parametric tests — a functional test is pass/fail with no
measured value to check a spec limit against. A
loLimit/hiLimitgiven for a test that is (or is being reclassified to) functional is dropped with a warning; the rest of that row's overrides (name, units, type) still apply. - A blank field means "don't override this" — it leaves the parsed value (or an override already loaded earlier in the session) alone. It never clears an existing value back to blank/zero. There's no way to revert an override from inside the app short of editing the file (blank the cell) or reloading the data fresh — Save/Load is the entire limit/type editing workflow, there is no in-app limit editor.
- A field tsmap can't parse (garbage numeric value, invalid test type, an unrecognized header column) is dropped with a log warning — the rest of that row, and the rest of the file, still load normally.
- A row whose saved test number isn't in the current scan is not immediately given up on: tsmap tries to recognise it by name instead, and if exactly one current test has that name, recovers it under its current number. This is what lets a saved list keep working across a CSV/JSON reload even though those two formats' test numbers are internal IDs, not identities from the file — reordering or adding columns can change them. (STDF/ATDF test numbers are real and don't change, so this mainly matters for CSV/JSON.) The log panel reports all three outcomes separately: matched by number, recovered by name (worth re-saving the list so it's back to matching by number directly), and genuinely not found. A name matching more than one current test is never guessed — it's reported as unresolved rather than silently picked.
You can hand-edit a list file to rename tests, or add/adjust limits, without changing anything
in the original data file — e.g. 1000,Threshold Voltage,0.2,1.2,mA,P. Those names, limits,
and type appear in the selector, on the map tooltip, in chart axis labels, and — for
limits — as histogram LSL/USL lines and in the Process Capability panel.
Memory advisory¶
The footer shows how many tests are selected and estimates the memory footprint (selected tests × total die count):
- Amber — large selection (roughly 50 million die×test pairs); the import will be slow.
- Red — very large selection (roughly 200 million die×test pairs); risk of running out of memory. You'll be asked to confirm before the import starts.
If you select no tests, tsmap asks you to confirm ("No tests selected — only bin data will be loaded. Continue?") before importing — the bin map is still fully usable with no tests selected.
After load: re-filtering¶
After a successful load, the toolbar's Setup ▾ menu offers Tests…. Click it to re-open the test selector at any time and change which tests are imported. The file is re-parsed with the new selection — bin and yield data is preserved regardless of which tests you select.
For multi-file batches, the selector is shown once and the same selection is applied to all files. By default the test definitions are scanned from the largest file only — a fast, representative default. If a test appears only in a smaller file (so it's missing from the list), click Scan all N files in the selector to re-scan every file and merge the full test definitions; your current selection is preserved. The "Tests…" dialog offers the same toggle if you didn't widen the scan at load time.
5. The wafer map view¶
After parsing, tsmap renders the wafer map. A single-wafer file shows one full-screen map with the summary panel open by default; a multi-wafer lot shows a side-by-side gallery.
For a full walkthrough of toolbar controls, plot modes, overlays, zoom and pan, die hover tooltips, the findings panel, the summary panel, and gallery controls, see the full wafer map guide — in the app it follows immediately below in this same window, not a separate page.
Zooming the interface¶
Ctrl and + / − scale the whole interface — menus, panels, tables and the map together — and Ctrl+0 returns to 100%. On macOS use Cmd. This is the app's own chrome zoom, and it is a different control from the wafer map's zoom described in the guide above: that one magnifies the map inside its panel and leaves the surrounding UI alone, while this one resizes everything, which is what you want on a high-DPI display or when showing the app to a room.
In the browser version this is simply the browser's own page zoom, so it works the same way without tsmap doing anything.
5.1 Dies with no reported position¶
Not every file reports an X/Y position for every die — see Dies with no reported position in the column mapping section for how that's assigned (or left unassigned) at load time. What a resulting positionless or mixed wafer looks like on screen, which toolbar controls it hides, and how findings treat it, is covered in the full wafer map guide ("Wafers and dies with no position data") — the same behaviour whether the file arrived as STDF, ATDF, CSV, JSON, or Parquet.
sample_data/COORDLESS-LOT-01.stdf demonstrates all three wafer states in one lot: W01 is
fully positioned, W02 is a mixed wafer (~15% of dies unpositioned), and W03 is fully
coordinate-less. A lot-level die list combining every wafer (with a wafer-id column) is
available from the toolbar's Setup ▾ menu for multi-wafer loads, with its own CSV export
covering the whole lot.
Value findings¶
The wafer map's summary panel has a Findings list — statistically significant spatial patterns: regions of the wafer (edge ring, quadrants, clusters, test sites) with unusually low yield or distinctive bin patterns. These yield and bin findings are fast to compute and always on.
Show test-value findings, in the toolbar's Setup ▾ menu, is a toggle (shown with a ☐ / ☑ checkbox) that adds one more category to that same Findings list: regions that read unusually high or low on a specific test value, or fail spec more often there than elsewhere ("the edge ring reads 8% high on VDD_CORE"). This is the only thing it changes. It does not affect:
- the panel's per-test Min/Mean/Max statistics (always shown),
- test-value maps or stacked value maps,
- the Insights tab (boxplots, histograms, scatter, correlation — all independent).
Because this regional value pass scales with regions × tests × dies, it is off by default to keep loads fast. The item is enabled once a file with test values is loaded; switch it on and the maps re-render with the extra findings in the panel — the wafer's data is already in memory, so this recomputes in place with no reload. Switch it off to remove them. It resets to off each time you load a new file, and is disabled while the Insights tab is open (it only affects the map's summary panel).
6. Wafer splits¶
A split is a name you assign to a wafer that isn't in the file at all — most commonly a
process corner (TT, FF, SS, FS, SF), but it can be anything: an experiment
condition, a test-temperature group, anything you want to compare wafers by that your
tester didn't record. Once assigned, splits behave exactly like any other metadata field
in the Insights tab's Group by dropdown — split-vs-split
yield, boxplots, histograms, correlation, and scatter all work immediately with no extra
setup — and they can optionally be shown right on the wafer map/gallery labels too.
Splits are one of tsmap's three kinds of definitions file, alongside test definitions and bin definitions — see those sections for the other two, and Definitions file formats for a filled-in template of all three.
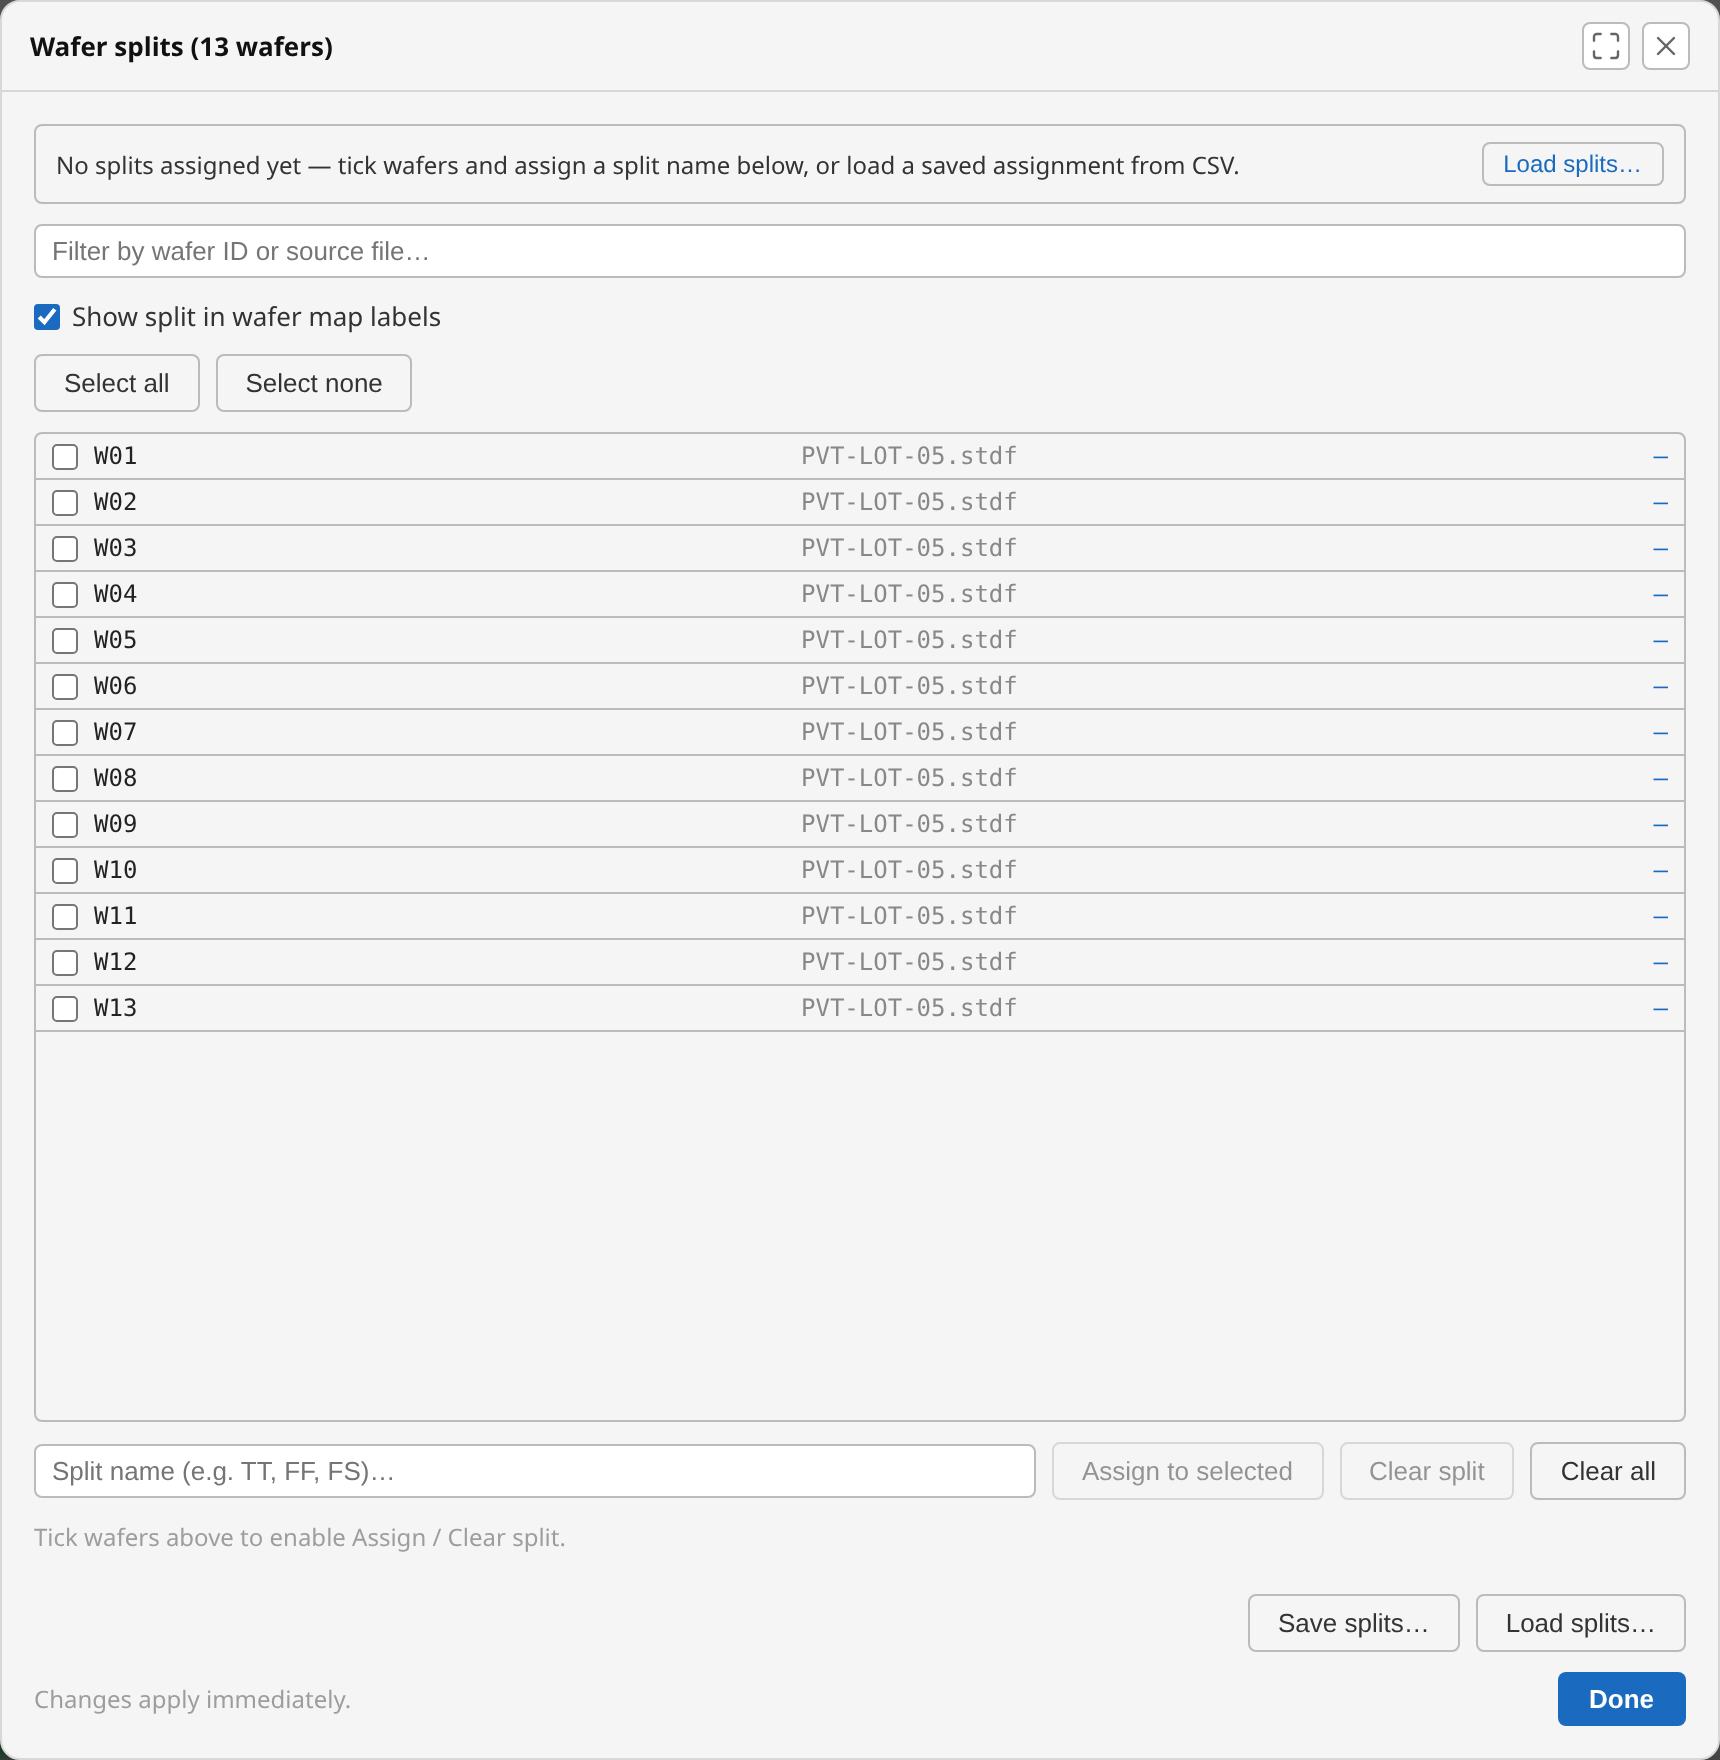
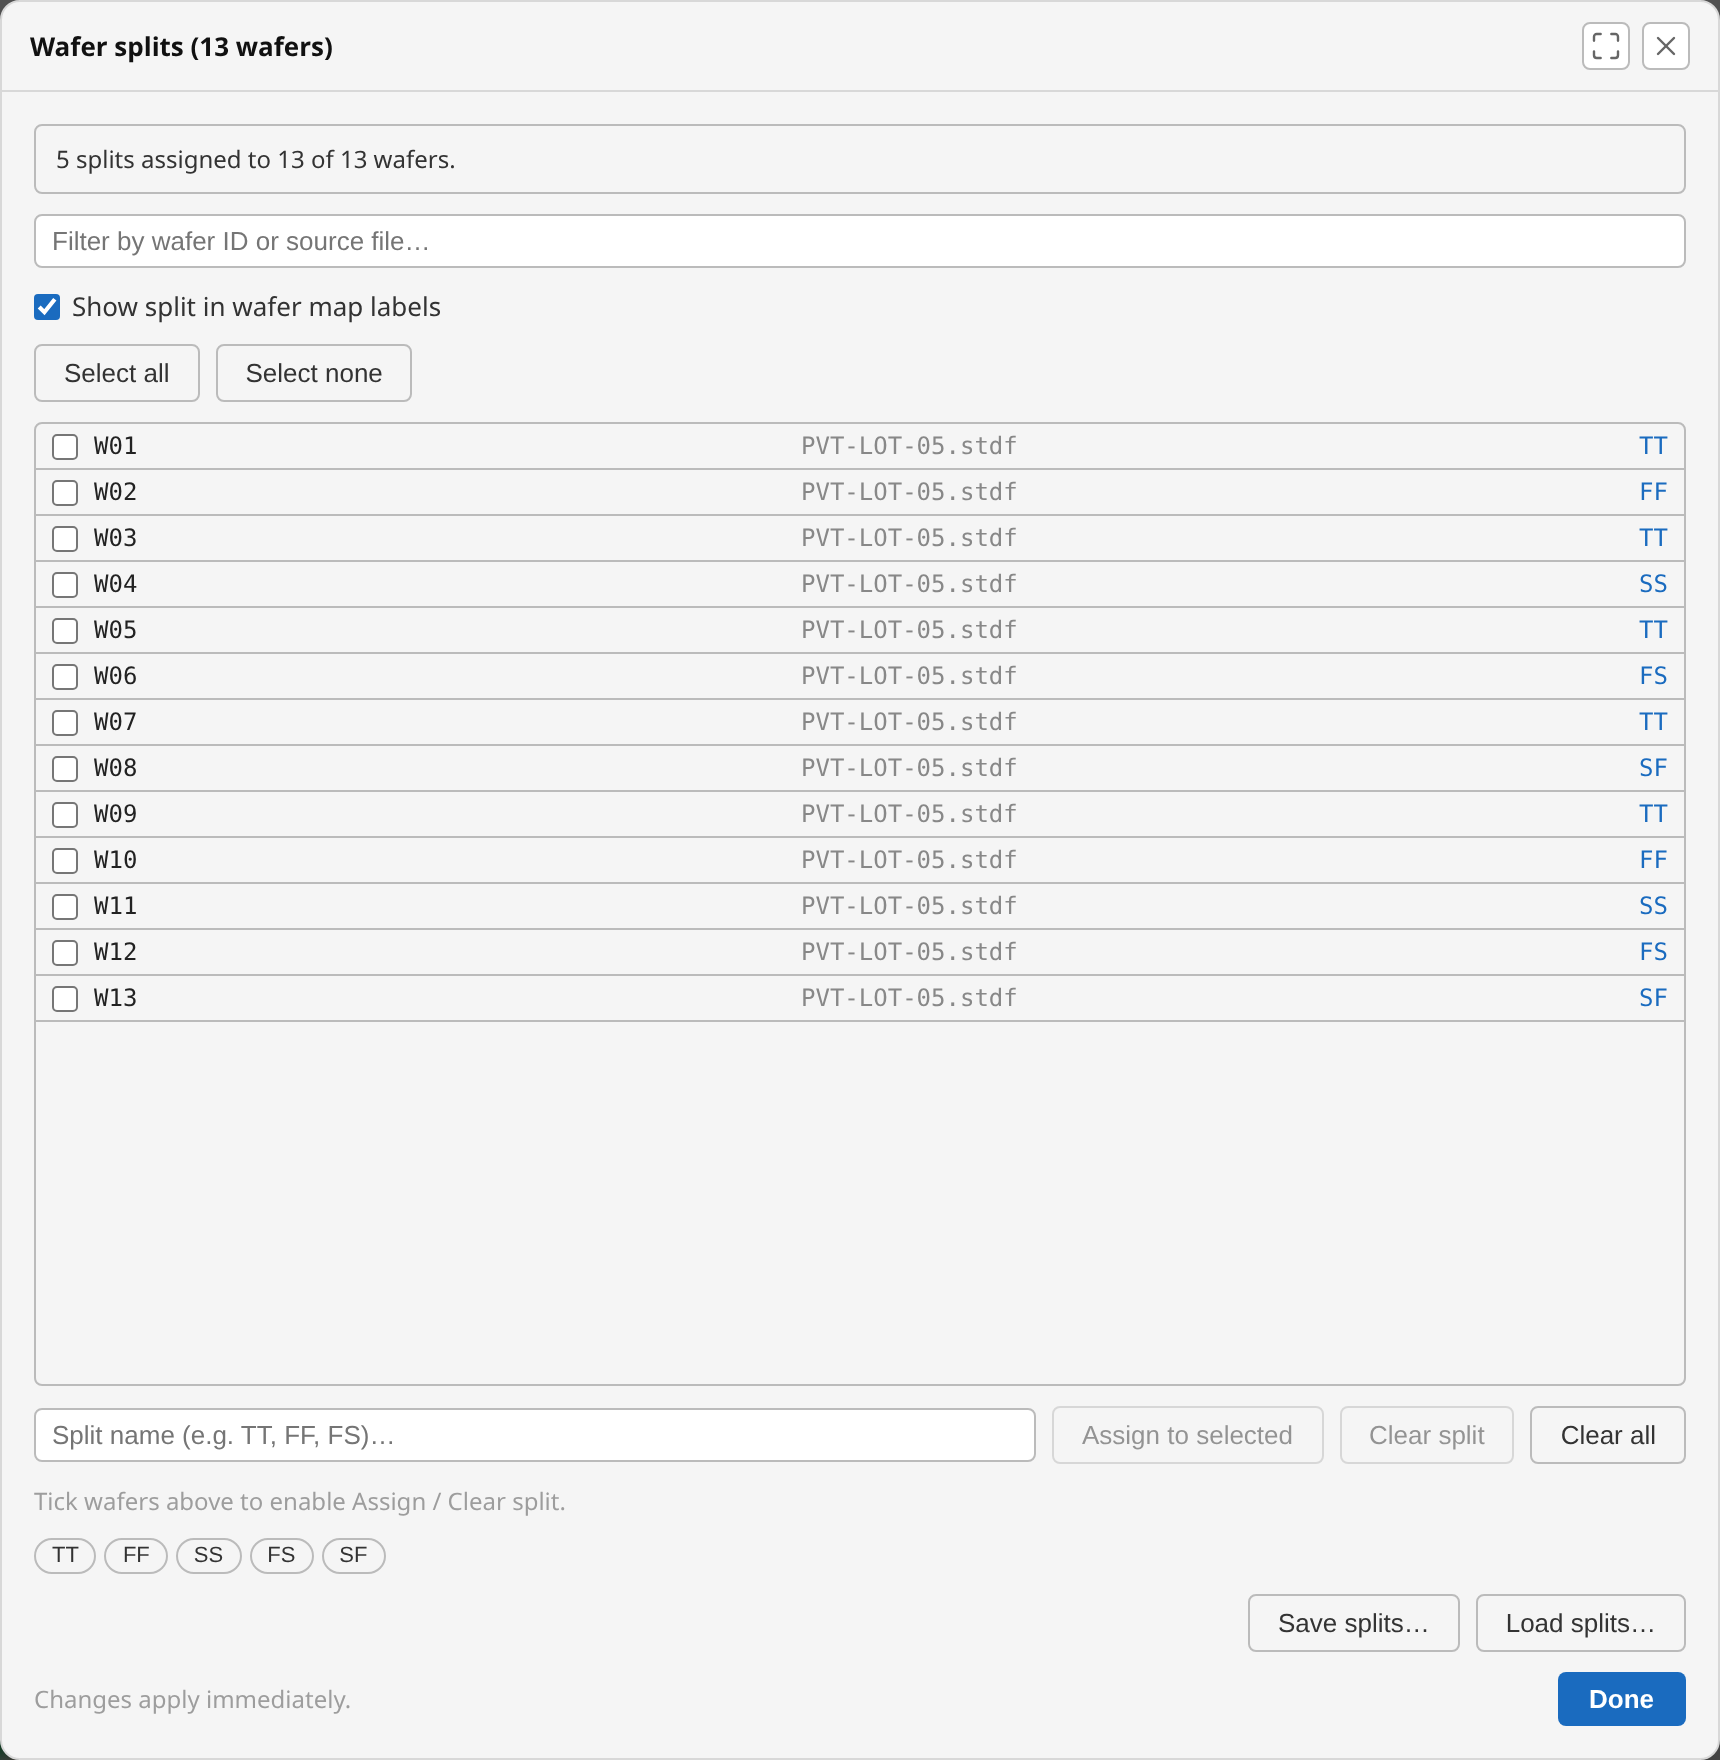
Once a file is loaded, open the toolbar's Setup ▾ menu and choose Splits… to open the assignment dialog. The banner at the top shows where things stand: with no assignments yet it points you at the two ways to get started (assign below, or load a saved CSV), and once splits exist it becomes a summary — e.g. "5 splits assigned to 13 of 13 wafers" — so a lot whose splits were restored automatically reads as already done:
6.1 Assigning splits¶
Tick the checkbox next to one or more wafers — click to toggle, Shift-click to select a
range, same as the test selector — type a split name (or click one of the chips below the
input to reuse an existing name, avoiding accidental near-duplicates like TT vs tt),
and click Assign to selected. Clear split removes the assignment from just the
checked rows; Clear all removes every wafer's assignment at once (after a confirmation,
since it's not scoped to your current selection). Every action applies immediately — there
is no separate save step, and Done just closes the window. The same keyboard gestures
work here as in the test selector: Shift+↑/↓, Shift+Space, and Ctrl/Cmd+A for
everything shown.
Unlike the test selector, ticking wafers here is never required to proceed — it only scopes the Assign to selected and Clear split buttons, which stay disabled until at least one wafer is ticked. Loading a CSV, Clear all, and Save splits… ignore the selection entirely.
6.2 Showing splits on the wafer map¶
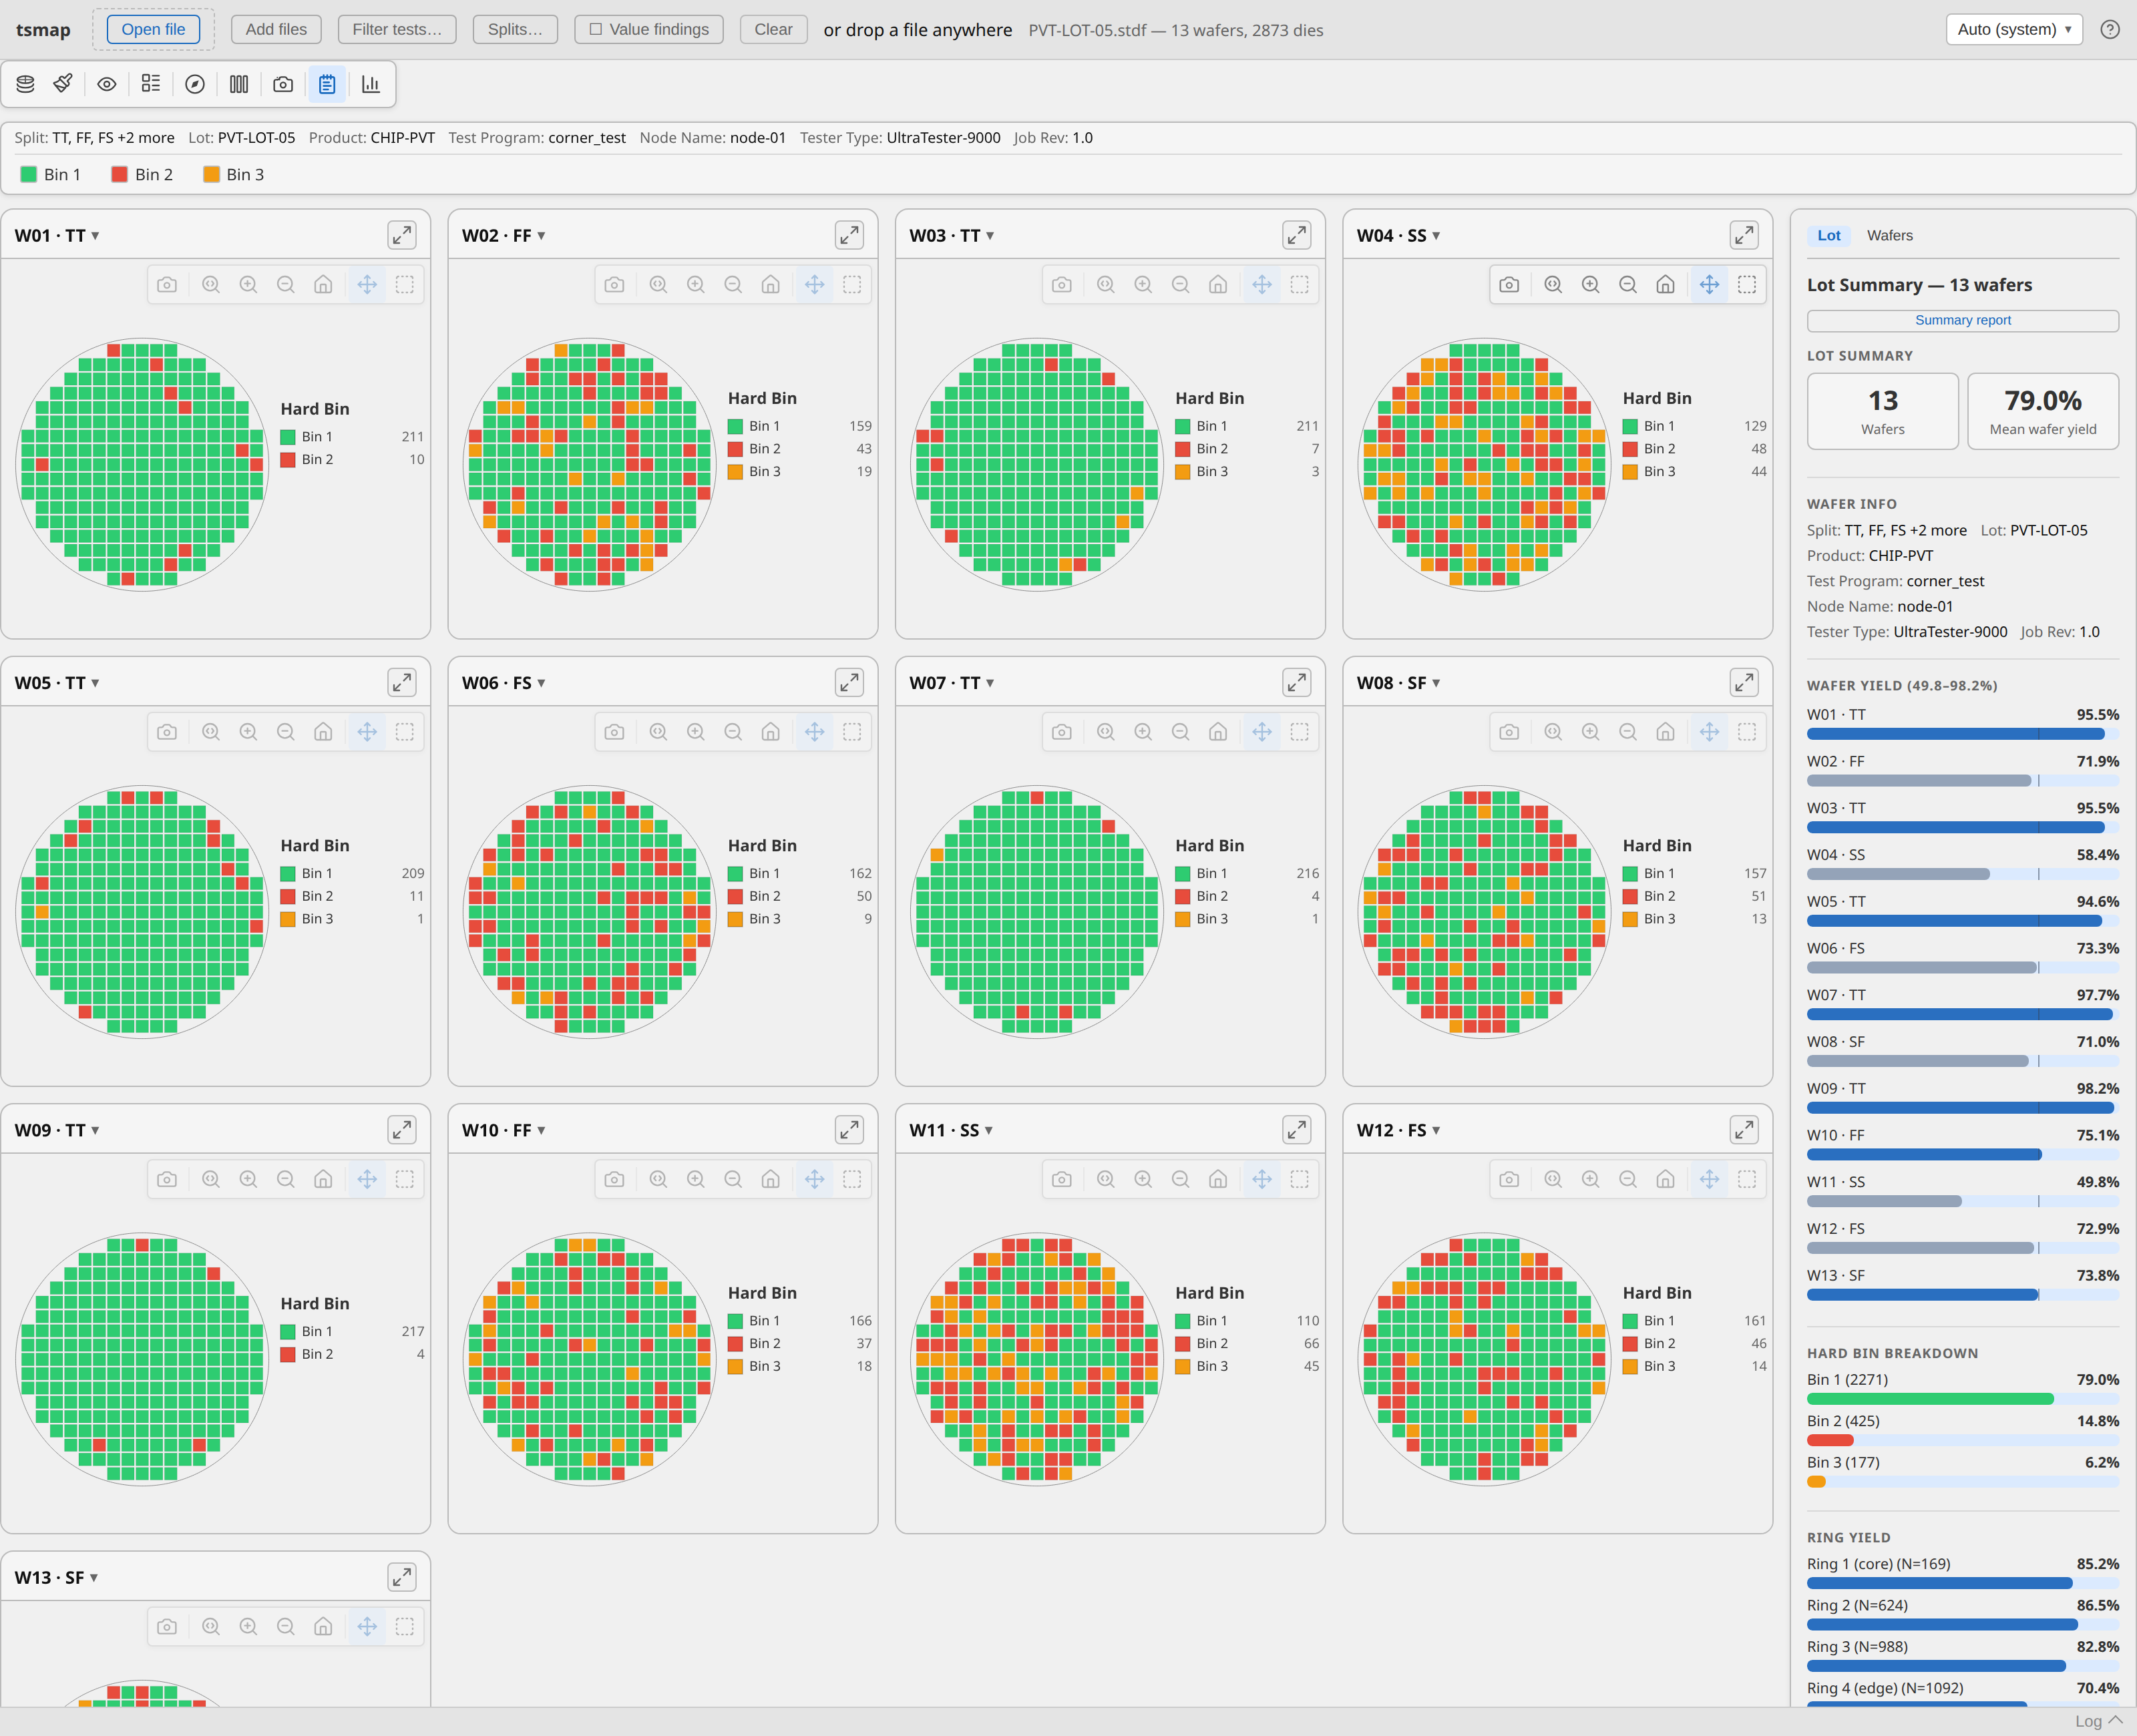
The "Show split in wafer map labels" checkbox (on by default) appends the split, as
W02 · FF, wherever a wafer's ID is shown — gallery card headers, the single-wafer view,
the summary panel's Wafer Id row, and drilldown modal titles. Turn it off to see plain
wafer IDs again; the underlying assignments are unchanged either way.
6.3 Saving and loading split definitions (CSV)¶
Save splits… writes every wafer's current assignment to a CSV file; Load splits… reads one back and applies it by matching each row to a loaded wafer — by lot and wafer ID, and by occurrence when the same wafer appears twice. Rows for wafers that aren't loaded are skipped, and a log message reports how many rows matched. This is the way to prepare a split definition ahead of time (e.g. from a fab's lot traveler) and apply it after loading the STDF, or to share a known-good corner mapping with a colleague. The format is a small CSV:
# tsmap wafer splits
# Saved: 2026-07-08T10:40:00.000Z
lot,waferId,occurrence,split
LOT-A,W01,,TT
LOT-A,W02,,FF
LOT-B,W01,,TT
- Lines starting with
#are comments and are ignored on load. lotandoccurrencemay be left blank, and the columns may come in any order. A file with justwaferId,split— which is what earlier versions of tsmap saved, header optional — still loads.occurrenceis only needed when one file holds the same wafer twice (a retest pass):1for the first appearance,2for the second. Save splits… fills it in only then.- A row with no lot, whose wafer ID is shared by several loaded wafers (W01 from two lots,
say), is skipped, not applied to all of them — the log says how many, and adding a
lotcolumn fixes it. - A wafer listed with an empty split value is treated as explicitly unassigned.
6.4 Restoring splits automatically¶
tsmap remembers split assignments per lot ID + wafer ID (plus part type, if present) — the physical wafer's identity, not the file it arrived in — so re-opening the same lot later restores them without reloading the CSV, even if that lot is split across several files (for example, one file per test temperature). With several lots loaded, each lot's W01 keeps its own assignment.
Wafers that share an ID are labelled apart. When two loaded wafers have the same wafer
ID, their gallery cards and the Splits dialog show what distinguishes them: the lot
(LOT-A · W01 / LOT-B · W01), then the file if the lot is the same, and as a last resort
the order they were loaded in (#1, #2) — for example a retest pass stored twice in one
file. This is only the label: reports and exports keep the real wafer ID, with the lot in its
own column.
This needs a lot ID. Data carrying none — a CSV export with no lot column, say — cannot be told apart from another file with the same wafer IDs, and W01–W03 is about as distinctive as wafer IDs get. Rather than risk applying one lot's splits to unrelated data, tsmap does not remember splits at all in that case: they apply to what is loaded, the Splits dialog says so in place of its usual "remembered for this lot" note, and Save splits… keeps them in a CSV you can reload deliberately. Map a lot column in the column mapping step and the automatic restore works as it does for STDF/ATDF. This restore is never silent: if any assignment is found for the wafers you just loaded, tsmap logs a message and automatically opens the Splits dialog so you can see exactly what was restored, edit it, or clear it — rather than silently changing chart groupings and map labels behind your back.
Clearing is remembered too. Clear all in the Splits dialog removes the assignments and forgets the saved copy for that lot, so re-opening it later comes back unassigned rather than restoring what you just cleared. That is the per-lot control; to forget saved splits for every lot at once — along with anything else tsmap remembers — use Help → Reset saved settings…, which stays reachable with nothing loaded.
7. Grouping data in the Insights tab¶
The Insights button in the map toolbar (both the single-wafer view and the gallery have their own) switches to a grid of statistical panels — yield, per-test pass rate, bin pareto, process capability, boxplot, histogram, wafer-to-wafer trend, correlation, and scatter — sharing the same parsed, in-memory data as the map, so switching never re-parses.
Every panel, its controls, and its grouping/drill-down behaviour are documented in full in the full wafer map guide — in the app, further down this same window. This section covers only the two things that are specific to how tsmap feeds data into it:
- Where the "Group by" field list comes from. Grouping is driven by metadata attached to each wafer at load time, plus any wafer splits you've assigned. STDF and ATDF contribute every field present in their MIR record — lot, sublot, part type, program, test temperature, test date, tester, node, operator, and more; CSV and JSON contribute the lot column plus any columns you mapped as metadata. Only fields that actually vary across the loaded wafers appear in the dropdown.
- A single-wafer load has nothing to group by, so every panel simply shows that one wafer's own data and the Group by control doesn't appear.
If you loaded wafers to compare two process arms, the panel to reach for is per-test pass rate on the Overview: with Group by set to your split, it ranks the tests worst-first with one sub-bar per arm, which is the question a split experiment is usually run to answer. It reports rates rather than counts, so arms with different wafer counts stay comparable. The same comparison is written into the lot summary report, so it can leave the app.
8. The log panel¶
A collapsible log panel sits at the bottom of the window. It shows timestamped messages from the parser and renderer: file load events, parse warnings, and any errors.

- Click Log to expand or collapse the panel.
- If any errors occurred, the button label changes to Log (N errors) and the panel expands automatically.
- Parser warnings (e.g. fabricated soft bin numbers from sentinel values, unrecognised records) appear here rather than blocking the load.
Soft bin 65535 is a sentinel value in the STDF spec meaning "no soft bin assigned to this die". When the parser encounters it, it maps those dies to a fabricated soft bin so the wafer map can render — the hard bin value is unaffected. The number in the warning (e.g. "fabricated bin 2 for 14 dies") is the count of dies where this substitution was applied. If soft bin data is not meaningful for your product, this warning can be ignored.
8.1 What tsmap remembers, and how to forget it¶
tsmap saves a few things between sessions so you don't have to set them up again: your colour theme, recently opened files, recently used definitions files, column mappings (per column layout), wafer split assignments (per lot), any wafer diameter and edge-exclusion override, and the last file filter.
All of it lives on this machine only — in your browser's storage, or the desktop app's own copy of it. Nothing is uploaded, and none of it travels with a file you share. Wafer data itself is never stored: it is re-read from your files each time.
Help → Reset saved settings… shows what is currently stored — only what actually exists, not everything tsmap could remember — with a line explaining each one. Tick what you want gone and choose Forget selected. Loaded wafer data is unaffected, and anything already on screen stays until the next load.
Useful when a saved column mapping is wrong and keeps being reapplied, when handing a shared machine to someone else, or when you simply want to see what the app is holding.
9. Desktop vs browser differences¶
| Feature | Desktop | Browser |
|---|---|---|
| File parsing | Native Rust (fast, off UI thread) | WASM in a Web Worker (same logic) |
| File picker | Native OS dialog | Browser dialog |
| Drag and drop | Yes | Yes |
| Folder scan and file filter | Yes (native folder picker or a dropped folder) | Yes (folder picker; scans at most 4 files at a time to bound memory) |
| PNG save | Native save dialog | Browser download folder |
| Zip extraction | Native Rust | In-browser (fflate) |
| Interface zoom (Ctrl +/−/0) | Yes | Yes (the browser's own page zoom) |
| Offline use | Yes | Yes — cached on first visit, then opens with no network |
| Install as an app | Yes (installer) | Yes in Chrome, Chromium and Edge; Firefox desktop cannot install web apps |
| Opening data from a URL | --url/--url-format CLI flags |
?dataUrl=&dataFormat= query params (subject to the target server's CORS policy) |
The browser version is functionally identical to the desktop app. Files are parsed entirely in your browser — nothing is sent to a server.
Browser requirements: Chrome 80+, Firefox 113+, Safari 16.4+, Edge 80+.
10. Test definitions¶
tsmap has three kinds of definitions file — test definitions, wafer splits, and bin definitions — each a small CSV round-trip for one axis of a lot's metadata that either isn't in the raw data at all, or that you want to correct/extend after parsing. This section and the next cover the two reached from the same place; splits get their own fuller section back at §6 since assigning them is an interactive workflow of its own, not just a file round-trip.
Once a file is loaded, open the toolbar's Setup ▾ menu and choose Tests…. That reopens the test selector over the lot you already have, and it is the single place for everything about tests:
- Which tests are imported — tick and untick, search, select a range.
- What they are called, and their limits — rename, set spec limits, units, and parametric/functional type.
- Save definitions / Load definitions ▾ — the same CSV round-trip described above, including the list of recently used definitions files.
Narrowing or relabelling applies immediately, in memory. Only widening the selection — asking for a test that was not imported — re-reads the files, and the button says Apply to N tests → rather than "Import" to reflect that.
Earlier versions split this across two menu entries — Filter tests… and Test definitions… — which read and wrote the same file with the same effect. The only real difference was whether the files were re-parsed, and that is a consequence of what you changed rather than a choice worth putting to you, so they are now one entry.
One thing is refused, deliberately. If the loaded files disagree about what a test number measures — test 1001 being a threshold voltage in one file and a leakage current in another — a name or unit for that number cannot be applied honestly, so it is skipped and named in the log while the rest of the file still applies. A limit is not refused: stating the spec explicitly resolves the ambiguity rather than hiding it.
See Test definitions (Save / Load) above for the CSV format itself.
11. Bin definitions¶
A bin definition is a human-readable name for a hard or soft bin number, plus (for hard
bins) whether it counts as pass or fail, and optionally the colour the bin is drawn in on every
map. STDF and ATDF already carry names and pass/fail in their own HBR/SBR
records, so a bin like 2 shows up as "Contact Open" without any extra step. CSV, JSON, and
Parquet have no equivalent record at all — every bin is just a bare number — unless you supply
definitions yourself.
For CSV/JSON/Parquet, load a bin-definitions file in the column mapping overlay's Load bin definitions… button (next to Pass bin(s)), before you continue past mapping.
For any format, once loaded, open the toolbar's Setup ▾ menu and choose Bin definitions… — the same lightweight Save/Load shape as Test definitions: no selection UI, an override on top of whatever's already there, and Load re-renders immediately once applied. For STDF/ATDF this overrides the names/pass-flags HBR/SBR supplied; for CSV/JSON/Parquet with nothing loaded yet, it supplies them outright.
The file is a CSV with a required header row:
# tsmap bin definitions
# Saved: 2026-08-20T09:15:00.000Z
bin,type,name,pass,color
1,hard,Pass,P,#2ca02c
2,hard,Contact Open,F,#d62728
10,soft,Leakage Fail,F,
- Header required —
bin,type,name,pass,color, any order, any subset, case-insensitive, with recognised synonyms (hbin/hardbin,sbin/softbin,binnum,pf,colour, etc.). A header cell ofhbinorsbinalso implies that row'stype, so a file naming only hard bins doesn't need a separatetypecolumn at all. typeishardorsoft(h/salso accepted). Hard bin 1 and soft bin 1 are independent entries — the same rule STDF/ATDF's own HBR/SBR follow. Defaults tohardwhen omitted, since most single-axis CSV/JSON/Parquet loads only map one bin column.passacceptsP/F,Y/N,true/false, or1/0. Only meaningful for hard bins in practice — a soft-bin row'spassvalue is still read, but wmap's own pass/fail logic looks at hard bin membership.coloris optional: a hex colour such as#1f77b4(or the short form#17b). A bin with a colour is drawn in it on every map, in place of the colour scheme's choice — the way to match a site's standard bin colour sheet. Bins without one still take colours from the scheme. To see the scheme's own colours instead, open the map's Colour scheme menu and untick Use colours from bin definitions.- A blank
name,passorcolorcell leaves whatever's already set for that bin alone; it never clears an existing value. Only a row whose bin number is unreadable is dropped entirely — a badtype,passorcolorcell drops just that field, with a warning, and the rest of the row still applies.
Colour choices are remembered. Whatever you pick in a map's Colour scheme menu — the bin colours, the value colours, and whether bin definition colours are used — carries over to the next file you open and to the next time tsmap starts. Bin colours and value colours are separate choices, so switching between a bin map and a value map never changes either. Clear them with Reset settings (they are listed there as Wafer map colours).
12. Wafer diameter and edge exclusion¶
tsmap normally works out each wafer's physical size from the die positions in the file, or (for STDF/ATDF) from the file's own WCR record when present. Open the toolbar's Setup ▾ menu and choose Diameter & edge exclusion… when you need to override that — most commonly for data too sparse to infer a diameter from (a handful of dies near the centre, say), or to add an edge-exclusion band: a ring near the wafer edge, measured in from the physical boundary, whose dies are excluded from yield and shown dimmed on the map.
- Wafer diameter (mm) pre-fills from whichever source tsmap trusts most for the currently loaded file: a WCR record's own diameter (real data, shown with no confidence figure), or wmap's own geometric inference — but only when that inference actually resolved physical units; a dimensionless grid-step count is never shown as if it were millimetres. If a value is already pinned and it disagrees with what the current file/wmap now say (for example, a different lot loaded since), a caption flags the mismatch without blocking Apply.
- Edge exclusion width (mm) is only meaningful relative to a confirmed diameter, so the field stays disabled — greyed out, with a "Set a diameter first" hint — until the diameter field holds a valid value. This is enforced live while typing, not just on Apply.
- Apply takes effect immediately, without reloading the file. Clear resets both fields together — leaving a pinned exclusion behind after the diameter reverts to auto-inferred would put the exclusion in an under-defined state, so the two always clear as a pair.
Once set, both values persist across restarts (like the theme picker) and apply to every wafer
in whatever's currently loaded — they're treated as fixed properties of your process, not
something that varies per wafer the way splits do. They stay in effect for
the next file you open too, until changed or cleared. --wafer-diameter/--edge-exclusion set
the same values from the command line at launch — see Command line above.
13. Definitions file formats¶
Help → Definitions file formats… is reachable at any time, including with nothing loaded yet — unlike every Setup ▾ dialog above, which needs a file open first. Each row (test definitions, splits, bin definitions) has a Save template… button that writes a realistic, filled-in example of that file, using the exact same formatter its real Save button uses — so the column layout is discoverable without reading this guide, and without loading any data first. Useful for preparing a definitions file ahead of time (e.g. from a fab's lot traveler or a product's bin-name table) before you have real tsmap data to save one from.